Haldex fault diagnosis is the process of using manufacturer-level diagnostic tools, live data analysis, and physical inspection to identify failures within an all-wheel-drive coupling system. Professional tools such as VCDS and ODIS communicate directly with the Haldex control module, something a standard OBD2 scanner cannot do reliably. Standard OBD2 scanners fail to communicate sufficiently with Haldex modules, which is why misdiagnosis is so common. Getting the diagnosis right from the start saves time, money, and avoids replacing components that were never faulty.
How Haldex diagnoses faults: reading the right error codes
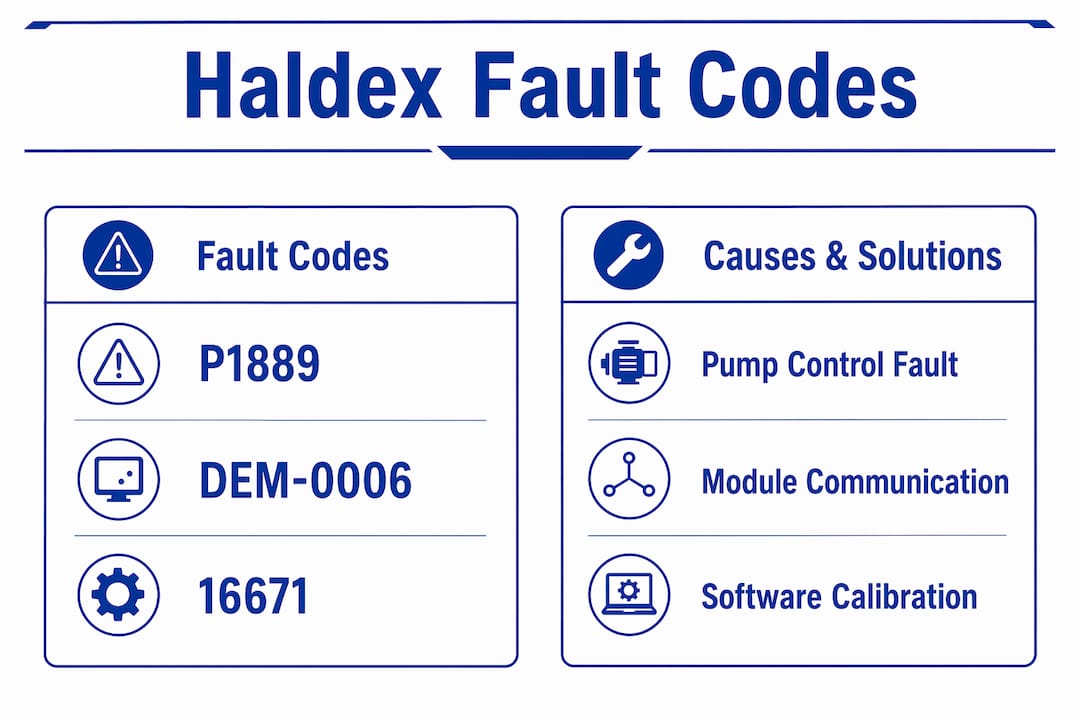
Fault codes are the starting point for any Haldex fault diagnosis, but not all codes mean what they appear to say at first glance. The three codes technicians encounter most often are P1889, DEM-0006, and 16671. Each points to a different layer of the system.
P1889 signals a power supply or pump control problem. This code typically appears when the pump motor is not receiving the correct voltage or when the control circuit has broken down. Codes like P1889 and DEM-0006 indicate power supply or pump control issues that require manufacturer-level adaptation after any repair work. Simply clearing the code and retesting is not sufficient. The DEM module must be cloned to communicate correctly with the vehicle’s electronic control units after replacement.

DEM-0006 is a module communication fault. It surfaces when the Haldex electronic module loses its pairing with the vehicle’s CAN bus network. Replacing the DEM unit without performing the correct software adaptation will leave this code active regardless of the hardware condition.
16671 is the most misunderstood of the three. Fault code 16671 often persists after pump replacement because the root cause is a software calibration deviation, not a mechanical failure. Resolving it requires deep-level re-calibration or specialist ECU intervention. Technicians who replace the pump and expect the code to clear are regularly disappointed.
The table below summarises the three critical codes and their most likely causes.
| Fault code | Likely cause | Resolution required |
|---|---|---|
| P1889 | Power supply or pump control failure | Check wiring, voltage supply, perform adaptation |
| DEM-0006 | Module communication or pairing loss | Clone DEM module, perform software adaptation |
| 16671 | Software calibration deviation | ECU re-calibration or specialist ECU repair |
Software-level adaptation failures complicate diagnosis significantly. A technician who replaces a pump motor without running the manufacturer adaptation routine will generate new fault codes even if the replacement part is perfectly serviceable. This is one of the most common and costly errors in Haldex repair. You can read more about post-replacement software steps to avoid this outcome.
How to test Haldex pump motors and sensors for hardware faults
Hardware testing is where diagnosis moves from the laptop screen to the physical components. The pump motor is the most frequently condemned part in a Haldex system, so testing it correctly before ordering a replacement is non-negotiable.
The correct method for testing a 5th-generation Haldex pump motor uses a multimeter set to the resistance (ohms) function. Disconnect the pump motor connector and measure resistance across the motor terminals.
- Set your multimeter to the resistance setting.
- Disconnect the pump motor electrical connector completely.
- Place the probes across the two motor terminals.
- Read the resistance value displayed.
- Compare the reading against the known thresholds.
Pump motor winding resistance between 5 and 8 ohms indicates a healthy motor. A reading below 2 ohms signals a failure risk and the motor should be replaced. A reading above 8 ohms or an open circuit reading suggests a broken winding. Both extremes confirm the motor is unserviceable.
Pro Tip: Always check the resistance of the replacement pump motor before fitting it. A motor damaged in transit will read outside the 5–8 ohm range and will generate fault codes immediately after installation.
Visual inspection runs alongside electrical testing. Remove the pump assembly and inspect the filter for metallic debris or discolouration. Dark, burnt-smelling fluid indicates the pump has been running hot, often because the filter was overdue for replacement. Contamination is a leading contributor to pump motor failure, and faulty pump motors most commonly fail due to lack of regular fluid maintenance rather than mechanical wear alone.
Sensor inspection follows the same logic. Check the wiring harness for chafing, corrosion at connectors, and any sign of rodent damage. A corroded ABS wheel speed sensor connector can generate a fault code that points directly at the Haldex unit, sending the diagnosis in entirely the wrong direction.
What does live data analysis reveal during Haldex road testing?
Static fault codes tell you what the system has recorded. Live data tells you what the system is doing right now. Both are necessary for a complete Haldex troubleshooting guide, and neither alone is sufficient.
Gen 5 Haldex diagnostics rely heavily on analysing pump motor speed control via PWM voltage rather than mechanical tests alone. This means the diagnostic tool must be capable of reading live module data, not just stored fault codes. Modern systems require digital data interpretation to understand clutch pressure and torque transfer in real time.
The key live data parameters to monitor during a road test are:
- Pump motor current draw. Excessive current draw under light load suggests a seized or partially failed motor. Low current draw when the system should be engaging points to a wiring or control fault.
- Hydraulic pressure output. A road test monitoring live pressure in the 5–7 bar range under load confirms proper pump and system function. Pressure below this range under demand indicates pump wear or an internal blockage.
- CAN bus data from ABS and ESP modules. The Haldex controller reads wheel speed data from the ABS module to decide when to engage. If the ABS module is sending corrupted or missing speed data, the Haldex unit will not engage correctly, and the fault will appear to be in the coupling itself.
- Clutch engagement confirmation. Some diagnostic platforms display a clutch engagement percentage. This value should rise progressively as rear-wheel demand increases during acceleration.
Pro Tip: Perform the road test on a surface where you can safely apply moderate acceleration from a standing start. This is the condition that most reliably triggers Haldex engagement and exposes pressure or current faults that do not appear at steady cruise speeds.
Clearing fault codes without a road test often misses internal blockages or wiring issues that only manifest under load. A system that reads clean on the bench can still fail to engage on the road. The road test is the final verification step, not an optional extra.
What are the most common Haldex diagnostic errors?
The single most damaging mistake in Haldex diagnosis is condemning the coupling unit before verifying the health of the ABS and ESP systems. Healthy diagnostic practice starts with verifying ABS and ESP system health before diagnosing the Haldex unit itself. Skipping this step leads directly to unnecessary parts replacement.
Red herring fault codes frequently mislead technicians into replacing healthy components. The most common example is an ABS wheel speed sensor fault that causes the Haldex warning light to illuminate. The symptom looks identical to a pump failure. Without scanning the ABS module separately, the two faults are indistinguishable from the dashboard alone.
Dashboard warning lights often reflect failures downstream, with the actual cause sitting upstream in wiring, sensors, or contamination. Electrical faults, poor fluid condition, and overdue maintenance account for many scenarios where the coupling itself is perfectly functional.
The table below compares genuine Haldex faults with common misdiagnoses.
| Symptom | Genuine Haldex fault | Common misdiagnosis |
|---|---|---|
| AWD warning light on | Pump motor failure | ABS wheel speed sensor fault |
| No rear-wheel engagement | Internal blockage or worn clutch | Faulty wiring to Haldex module |
| Code 16671 persists after pump swap | Software calibration deviation | Assumed second pump failure |
| DEM-0006 after module replacement | Adaptation not performed | Assumed faulty replacement part |
Contamination is another source of misdiagnosis. Overdue fluid and filter changes allow metallic particles to circulate through the pump, causing wear patterns that mimic electrical faults on live data. A technician who sees erratic pressure readings and assumes a sensor fault may be looking at a pump that is simply starved of clean fluid. Checking the service history for Haldex maintenance intervals is a quick way to rule this out before going further.
Throwing parts at Haldex issues without thorough scanning and live data checks is the most costly mistake in repairs. A systematic workflow, scanning all modules first, testing hardware second, and road testing last, eliminates the guesswork that drives unnecessary expenditure.
Key takeaways
Accurate Haldex fault diagnosis requires scanning all related modules, testing hardware against known resistance thresholds, and confirming system behaviour with a live data road test before replacing any component.
| Point | Details |
|---|---|
| Scan all modules first | Check ABS and ESP modules before diagnosing the Haldex unit to avoid red herring fault codes. |
| Know your fault codes | P1889, DEM-0006, and 16671 each require different resolutions beyond simple part replacement. |
| Test pump resistance | A healthy 5th-gen pump motor reads 5–8 ohms; below 2 ohms confirms failure. |
| Road test with live data | Confirm 5–7 bar pressure output under load before closing any Haldex diagnosis. |
| Maintain fluid and filter | Overdue servicing causes contamination faults that mimic electrical or mechanical failures. |
Why I always scan everything before I touch a single bolt
After years of working with Haldex systems across Audi, VW, Skoda, and Land Rover platforms, the lesson that has saved me the most money for customers is simple. Never assume the warning light is telling you the whole story.
The first time I saw a code 16671 persist after a pump replacement, I made the same mistake most technicians make. I assumed the replacement part was faulty. It was not. The controller needed re-calibration, and no amount of hardware swapping was going to resolve that. That experience changed how I approach every Haldex job since.
The diagnostic methodology has shifted dramatically from Gen 1 to Gen 5. Early systems responded well to mechanical checks and fluid changes. Modern units demand software-driven data analysis, and technicians who still rely on mechanical intuition alone will consistently misdiagnose Gen 5 faults. The evolution of Haldex AWD control is not just a product story. It is a diagnostic story.
My workflow is fixed: scan all modules, check ABS and ESP first, test pump resistance, inspect the filter and fluid condition, then road test with live data before I write any report. Skipping any step in that sequence creates the conditions for a misdiagnosis. The Haldex coupling noise guide covers a related set of symptoms that often appear alongside fault codes and are worth cross-referencing on any complex job.
Regular fluid and filter maintenance is not just a service item. It is the single most effective way to prevent the contamination faults that make diagnosis unnecessarily complicated. A clean system with fresh fluid is far easier to read accurately than one running on degraded oil full of metallic debris.
— Mindaugas
Haldexparts: OEM-grade parts for every stage of diagnosis and repair
When diagnosis confirms a faulty pump, worn filter, or degraded fluid, the quality of the replacement parts determines whether the repair holds. Haldexparts supplies OEM-grade Haldex service kits covering pumps, oils, and filters for Audi, VW, Ford, Land Rover, and more. Every kit is matched to a specific vehicle and generation, so you are not guessing at compatibility. Orders over £150 qualify for free shipping, and the product listings include the technical detail technicians need to confirm fitment before ordering. For pump replacements specifically, the Haldex pump range covers all major generations with verified OEM specifications.
FAQ
What tools do I need to diagnose Haldex faults?
VCDS or ODIS are the standard tools for communicating with Haldex control modules. Standard OBD2 scanners cannot read Haldex-specific fault codes or live data reliably.
Why does fault code 16671 return after replacing the pump?
Code 16671 signals a software calibration deviation, not a mechanical failure. Resolving it requires ECU re-calibration or specialist ECU repair, not a second pump replacement.
What resistance should a healthy Haldex pump motor read?
A healthy 5th-generation Haldex pump motor reads between 5 and 8 ohms. A reading below 2 ohms confirms the motor has failed and requires replacement.
Can an ABS sensor fault cause a Haldex warning light?
Yes. A faulty ABS wheel speed sensor sends corrupted data to the Haldex controller, which can trigger the AWD warning light and mimic pump failure symptoms entirely.
How often should Haldex fluid and filter be changed?
Service intervals vary by manufacturer and driving conditions, but overdue fluid and filter changes are a leading cause of contamination faults that complicate diagnosis and accelerate pump wear.