

The fastest way to restore sluggish Haldex engagement is to check fluid condition, verify pump electrical supply, and run a pump relearn. Those three steps resolve the majority of slow-response complaints without touching the clutch pack or replacing major components.
Immediate action checklist:
- Check Haldex oil condition and level; replace if dark, metallic, or overdue
- Inspect pump fuse, relay, and supply voltage at the pump connector
- Scan for DTCs relating to pump motor, pressure sensor, and ABS/wheel speed inputs
- Run a pump relearn/adaptation procedure after any fluid or pump work
- Record your vehicle’s Haldex generation and current ECU software version before making any changes
Quick cautions: Any modification to AWD software or hardware can affect your MOT result and invalidate insurance cover. Never run pump activation tests with the vehicle in an unsafe position. Live-data work near rotating driveshafts carries a real injury risk. If the vehicle is immobilising itself or showing active traction warnings, do not drive it to a workshop; recover it instead.
Haldex GEN 5 (the generation fitted to Golf R, Audi S3, and related platforms) behave differently from earlier units. Its electric pump and proactive engagement logic mean electrical and software checks come before hydraulic disassembly. Haldexparts stocks generation-specific service kits, pumps, and oils for UK buyers, with parts selectable by vehicle make and Haldex generation.
Key takeaways
Haldex coupling response time improves most reliably by addressing fluid condition, pump electrical health, and pump relearn in that order before considering any hardware or software upgrades.
| Point | Details |
|---|---|
| Fluid and filter first | Fresh OEM-spec oil and a clean strainer directly reduce clutch fill time; this single step resolves most slow-response complaints. |
| Pump electrical health | Check supply voltage and current profile before condemning the pump; a weak battery or poor earth mimics pump failure on Gen V systems. |
| Pump relearn is mandatory | After any fluid change or pump work on Gen V, run the adaptation procedure; skipping it leaves the ECU on stale values and produces slow engagement. |
| Upgrade with caution | ECU tuning can reduce engagement lag but risks harsh clutch pulses; document factory calibration and validate with live data before and after. |
| Haldexparts for UK supply | Generation-specific service kits, pumps, and oils are available at Haldexparts with fitment guidance and free shipping on orders over £150. |
Table of Contents
- How Haldex coupling response time actually works
- How engagement speed changed across Haldex generations
- Recognising slow Haldex engagement and diagnosing the cause
- Service procedures that restore coupling performance
- ECU software, calibration, and aftermarket upgrades
- When to service, refurbish, or replace the coupling
- Pump relearn and adaptation: the steps and the tools you need
- What to prioritise first: an honest perspective
- OEM Haldex service kits and parts for UK buyers
- Sources
How Haldex coupling response time actually works
Haldex coupling response time measures the interval between the moment the control module commands clutch engagement and the moment the rear axle receives meaningful torque. The timer starts when sensor inputs cross the module’s engagement threshold; it ends when clutch pressure reaches the level needed to transfer torque to the rear differential.
Understanding the component chain makes every diagnostic step logical rather than guesswork. The Haldex coupling is an electronically controlled hydraulic-mechanical part-time AWD system: a pump pressurises hydraulic fluid, the ECU opens a valve, and that pressurised fluid pushes against a multi-plate clutch to drive the rear axle. Each link in that chain can introduce delay.
Signal and data flow:
Wheel speed sensors and ABS/ESP modules feed differential speed data to the Haldex control module over the CAN bus. The module also reads throttle position, yaw rate, and steering angle. It calculates a demanded clutch pressure and commands the pump and pressure regulator accordingly. The Haldex control module uses ABS wheel speed, engine throttle and yaw/steering inputs over CAN to command the pump and pressure regulator; if any of those signals are absent or corrupted, the module either defaults to a safe (disengaged) state or produces erratic engagement.
Component-level causes of slow response:
- Degraded oil: viscosity rises as Haldex fluid ages or becomes contaminated. Thicker fluid takes longer to fill the clutch pack, directly extending clutch fill time.
- Pump wear or electrical fault: a worn mechanical pump delivers lower flow; an electric pump with a failing motor draws abnormal current and builds pressure slowly.
- Sticking valve or regulator: a valve that opens sluggishly delays pressure rise regardless of pump output.
- ECU input latency or signal noise: corrupted wheel speed data causes the module to hesitate before commanding engagement.
- Temperature extremes: cold fluid is more viscous; very hot fluid loses pressure retention. Both extend response time.
Live data points worth monitoring during diagnosis include: differential wheel speed delta (front vs rear), pump motor current draw, commanded clutch pressure vs actual clutch pressure, and fluid temperature. Mismatches between commanded and actual pressure almost always point to a hydraulic blockage or pump degradation.
Pump flow, fluid viscosity, and pressure dynamics are significant determinants of clutch fill time. Academic pump and actuator models validated against hardware measurements confirm that a correct oil specification and fresh fluid can measurably improve response without any major hardware changes. Lund University pump modelling research supports this directly.
How engagement speed changed across Haldex generations
Each generation brought architectural changes that shifted where response delays originate. Knowing your generation tells you where to look first.
Generation timeline (response-relevant changes):
- Gen I (1998–2002): Mechanical pump driven by the prop shaft. Response is entirely reactive; the pump only builds pressure when there is already relative rotation between front and rear shafts. Slow by design.
- Gen II (2002–2004): Revised pump and valve arrangement; marginal response improvement. Same reactive architecture.
- Gen III (2004–2007): Hydraulic accumulator added, allowing some pre-charge. Response faster than Gen I/II because pressure is partially available before slip occurs.
- Gen IV (2007–2012): Improved accumulator management and revised ECU logic. Faster still, but accumulator condition becomes a key variable.
- Gen V (2012–present): Electric pump replaces the mechanical unit entirely. The ECU can command the pump proactively, before measurable wheel slip, based on throttle and dynamic inputs.
Gen V architecture uses an electric pump and electronic control that allows proactive engagement before measurable wheel slip occurs, but behaviour varies between vehicle manufacturers and their individual calibrations. A Golf R and an Audi TT RS with identical hardware can engage at noticeably different speeds because of manufacturer-specific ECU maps.
Generation-specific priority checks:
| Generation | Expected response behaviour | Typical weak points | First checks |
|---|---|---|---|
| Gen I–II | Reactive only; inherently slower | Mechanical pump wear, throttle valve sticking | Pump condition, valve freedom, fluid spec |
| Gen III | Pre-charged; moderate speed | Accumulator leak-down, pump seal wear | Accumulator pre-charge, pump seals, fluid |
| Gen IV | Fast pre-charge; ECU-dependent | Accumulator pressure loss, pump/ECU calibration | Accumulator health, pump current, DTCs |
| Gen V | Proactive; electrically driven | Electric pump motor, pump relearn, sensor inputs | Pump motor current, relearn status, DTCs |
Academic control-design comparisons show that earlier generations tolerate CAN signal delays and friction variation better, while Gen V can be faster but requires precise sensor and pump behaviour to avoid false engagements or harsh clutch pulses.
Pro Tip: For Gen V, always start with the electrical and software domain before opening anything hydraulic. A failed pump relearn after a fluid change is one of the most common causes of slow or erratic engagement on Gen V vehicles, and it costs nothing to fix if caught early.
Recognising slow Haldex engagement and diagnosing the cause
Slow engagement rarely announces itself with a single obvious fault. More often it shows up as a collection of subtle symptoms that worsen progressively.
Common symptoms:
- Excessive front wheel spin under hard acceleration before rear torque arrives
- Pulsing or shuddering sensation as the clutch engages and releases repeatedly
- AWD or traction warning lights, particularly under load
- Noticeably longer slip duration on low-grip surfaces compared to the vehicle’s normal behaviour
- Pump audible noise (whining or clicking) during engagement attempts
DTCs commonly associated with slow or erratic engagement:
- Pump motor circuit faults (open circuit, over-current, under-voltage)
- Pressure sensor faults (signal out of range, implausible value)
- Wheel speed sensor faults (ABS/ESP codes that feed the Haldex module)
- Clutch pressure deviation codes (commanded vs actual pressure mismatch)
Pump faults and pressure sensor failures are among the most common causes of slow or erratic Haldex engagement, and pump motor current profiling is a practical first step before any disassembly.
Stepwise triage:
- Battery and supply voltage: a weak battery or poor earth causes the electric pump (Gen V) to underperform. Check supply voltage at the pump connector under load.
- Fuse and relay: locate the Haldex pump fuse and relay in the vehicle’s fuse box. A blown fuse gives zero AWD; a marginal relay gives intermittent or slow response.
- Pump activation test: using a scan tool, command the pump on and observe current draw. A healthy Gen V pump draws a consistent current profile during ramp-up.
- Pressure sensor sanity check: read live pressure data. If the sensor reports zero or an implausible value with the pump running, suspect the sensor or its wiring before condemning the pump.
- Clutch pressure vs commanded value: compare the module’s requested pressure against the measured value. A persistent gap points to a hydraulic restriction, worn pump, or sticking valve.
For a deeper look at what triggers Haldex engagement and the sensor inputs involved, the full guide covers the signal chain in detail.
Service procedures that restore coupling performance
A full Haldex coupling service is the single highest-return maintenance task for response time. Fresh fluid alone can measurably reduce clutch fill time because pump flow and fluid viscosity are significant determinants of clutch fill time, and aged fluid loses its specified viscosity profile.
Parts required
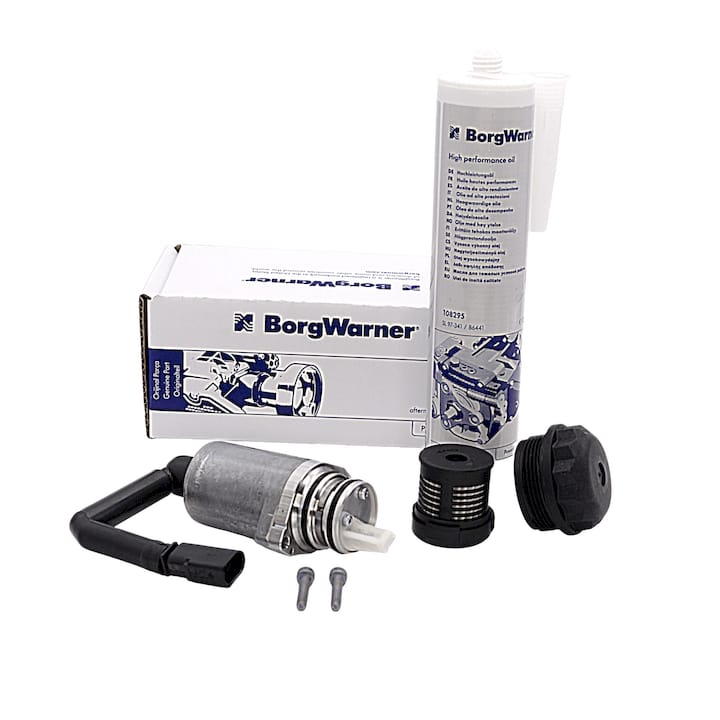
- Haldex-spec oil: always use the oil grade specified for your generation. Gen V typically requires a low-viscosity fluid (e.g. G 055 175 A2 or equivalent OEM spec). Using the wrong grade is one of the most common causes of post-service sluggishness.
- Filter/strainer kit: the internal strainer catches metallic debris from pump and clutch wear. A blocked strainer restricts flow to the pump inlet and directly extends pressure build-up time.
- Pump seal kit (if resealing): for Gen V, the 0CQ598305 seal repair kit and oil set covers the pump seals and includes the correct oil in one package.
- Replacement pump motor (if required): check pump motor listings by generation and vehicle make.
Tools required
- OBD scan tool with live data, DTC read/clear, pump activation command, and adaptation/relearn function
- Fluid transfer pump or syringe for oil fill
- Torque wrench (coupling drain plug and filter housing torques are specified; do not guess)
- Pressure gauge or scan tool with live pressure readout
- Basic socket set and trim removal tools for underbody access
Step-by-step service checklist
- Raise the vehicle safely on axle stands or a ramp; never rely on a trolley jack alone.
- Locate the Haldex coupling unit on the rear axle assembly.
- Place a drain tray; remove the drain plug and allow fluid to drain fully. Note the condition: metallic particles or a dark, burnt smell indicate clutch or pump wear.
- Remove the filter/strainer housing. Clean the strainer or replace it per the service kit instructions.
- Inspect the pump inlet and housing for debris. If the strainer is heavily loaded with metallic swarf, inspect the pump more carefully before refilling.
- Refit the strainer/filter with new seals. Torque to specification.
- Refit the drain plug with a new sealing washer. Torque to specification.
- Fill with the correct Haldex oil to the specified volume. Do not overfill.
- Reconnect any electrical connectors disturbed during access; check for corrosion or spread terminals.
- Run the pump relearn/adaptation procedure (see Section 8 for the full sequence).
- Clear all DTCs and road test with live data monitoring.
Time and cost estimates (UK workshop context):
A standard fluid and filter service typically takes 45–90 minutes in a well-equipped workshop. Parts cost varies by generation and vehicle; a complete service kit covering oil, filter, and seals runs from approximately £40 to £120 depending on generation and vehicle. Exact time and cost depend on factors like generation and vehicle access, so always check fitment before ordering. Pump replacement adds 1–2 hours of labour and the pump unit cost on top.
Pro Tip: Before dismantling anything, command the pump on with a scan tool and record the current profile. A healthy pump ramps up smoothly; a failing one shows a flat, spiking, or absent current trace. This 90-second check can save hours of unnecessary disassembly.
For Haldex hydraulic pressure ranges and what the live data should show during a healthy service, the dedicated pressure guide is worth reading before you start.
ECU software, calibration, and aftermarket upgrades
The ECU’s engagement map determines whether the coupling reacts to slip that has already occurred or anticipates it from throttle and dynamic inputs. Changing that map changes the character of engagement, not just its speed.
Before any software change, record:
- Vehicle VIN and current ECU software version (read via OBD)
- Current DTC status and any stored adaptation values
- A live-data baseline: pump current, clutch pressure, and wheel speed delta during a controlled test
Upgrade paths and their realistic effects:
- ECU remap or parameter tune: adjusting engagement thresholds and pump command maps can reduce the slip delta required to trigger engagement. Faster, but a performance tune can produce harsh clutch pulses under certain slip/grip cycles if the parameters are not carefully optimised for the vehicle’s weight and tyre characteristics.
- Pump motor replacement with a higher-flow unit: a pump that builds pressure faster reduces clutch fill time directly. The benefit is real but requires a relearn and pressure sensor validation after fitting.
- Pressure sensor upgrade: a more responsive sensor gives the ECU faster feedback, tightening the control loop. Useful when the existing sensor is slow or noisy.
- Proportional valve replacement: research into replacing throttle valve control with proportional valves showed potential to reduce temperature dependency and improve response when properly tuned, but the parameters require careful optimisation. This is specialist territory, not a DIY upgrade.
For a practical overview of Haldex controller upgrades and what they actually change, the dedicated guide covers the options in detail.
UK legal and insurance considerations:
Any modification that alters AWD engagement behaviour is a material change to the vehicle’s handling characteristics. You must declare it to your insurer. Failure to do so can void a claim. ECU remaps that affect traction systems can also affect MOT results if they trigger warning lights or alter ABS/ESP behaviour. Always use a reputable tuner who can provide documentation of the changes made.
Validation steps after any upgrade:
- Capture live data (pump current, clutch pressure, wheel speed delta) on the same test route used for the baseline
- Confirm no new DTCs after a full drive cycle
- Test on a low-grip surface (wet road, gravel) to verify engagement feel matches expectation
- Keep a rollback plan: retain the original ECU file or calibration values before any remap
For Haldex controller tuning guidance and the cautions that apply, the tuning guide covers the practical steps.
When to service, refurbish, or replace the coupling
Not every slow-response complaint needs a new pump. The decision depends on what the diagnostic data actually shows.
Decision flow:
- Fluid overdue or degraded, no DTCs, pump current normal: service only. Drain, filter, refill, relearn. This resolves a large proportion of slow-response complaints.
- Pump current abnormal (flat, spiking, or absent), pressure builds slowly: pump motor suspect. Bench-test the pump before ordering parts. A pump that runs normally off the vehicle but poorly in-situ points to a supply voltage or wiring issue rather than the pump itself.
- Metal debris in drained fluid, clutch pressure deviation DTC present: inspect the clutch pack. Debris from clutch wear indicates internal damage; a service alone will not restore performance.
- Recurring DTCs after correct service and relearn: suspect a pressure sensor, wiring harness fault, or ECU calibration issue. These require specialist diagnostic time.
- Casing damage, severe clutch wear, or internal scoring: full coupling replacement is the only reliable fix.
Typical UK cost bands:
| Repair type | Typical parts cost | Labour complexity | Who should do it |
|---|---|---|---|
| Fluid and filter service | £40–£120 | DIY-capable with basic tools | Enthusiast or technician |
| Pump motor replacement | £100–£200 | Technician level | Workshop with scan tool |
| Full coupling replacement | £350–£700 | Specialist | Specialist AWD workshop |
Exact time and cost may vary based on generation, vehicle model, and workshop rates; check fitment and parts compatibility before confirming a service plan.
All-wheel-drive control design comparisons note that later generations can be faster but are less tolerant of sensor and pump degradation than earlier mechanical units. On Gen V, a marginal pump that would have been acceptable on Gen III will produce noticeable response delays because the electric pump’s current profile is tightly monitored by the ECU.
For a broader look at what causes Haldex failure and how to distinguish wear from damage, the failure guide provides a useful diagnostic checklist.
Pump relearn and adaptation: the steps and the tools you need
A pump relearn is not optional after any fluid change, pump replacement, or ECU reset on Gen V systems. Skipping it leaves the ECU operating on stale adaptation values, which typically produces slow or inconsistent engagement even when the hardware is in perfect condition.
Generic pump relearn sequence:
- Connect a compatible scan tool and confirm no active DTCs before starting. Resolve any faults first.
- With the ignition on and engine off, command the pump on via the scan tool’s actuator test function. Allow the pump to run for the specified flush duration (typically 30–60 seconds) to purge air from the hydraulic circuit.
- Start the engine and allow the system to reach operating temperature if the tool’s adaptation routine requires a warm system.
- Navigate to the Haldex or AWD module’s adaptation/relearn function in the scan tool. Execute the routine and follow any on-screen prompts (the exact menu path varies by tool and vehicle).
- Confirm the adaptation completes without fault. If it aborts, check for DTCs, verify supply voltage, and retry.
- Clear all DTCs and perform a cold test: drive at low speed with gentle steering inputs to allow the system to log initial adaptation data.
- Perform a warm test: a controlled acceleration on a safe road with live data running to confirm pressure ramp-up speed and pump current profile are within normal range.
Scan tool capabilities required:
- Live data readout: pump motor current, clutch pressure (commanded and actual), fluid temperature, wheel speed delta
- Actuator test: ability to command the pump motor on/off independently
- DTC read and clear for the AWD/Haldex module
- Adaptation/reset function for the Haldex coupling (not all generic OBD tools have this; a VAG-specific tool or equivalent is typically required for VAG-platform vehicles)
Safety and verification after relearn:
- Never run the pump activation test with the vehicle in gear or on an unsecured lift
- After the cold test, re-read DTCs to confirm no new faults have been logged
- Compare live pressure data against the pre-service baseline if one was recorded
- For vehicles used in performance driving, monitor how Haldex responds under hard acceleration after the relearn to confirm engagement feel is consistent
What to prioritise first: an honest perspective
Most slow Haldex engagement problems are maintenance problems, not hardware failures. That sounds obvious, but the number of coupling units replaced unnecessarily because a pump relearn was never run is genuinely significant. The fluid and relearn steps cost a fraction of a pump replacement and resolve the majority of complaints.
For enthusiasts doing their own work, the priority order is clear: visual checks first (connectors, wiring, obvious leaks), then fluid condition and level, then a DTC scan. If the fluid is dark and the filter is blocked, service it before drawing any conclusions about the pump. A blocked strainer starves the pump of flow and mimics a failing pump motor almost perfectly.
Technicians should resist the temptation to jump straight to component replacement. The conservative approach is to verify pump current profile, pressure sensor readings, and ECU commanded pressure together. Mismatches between commanded and actual pressure narrow the fault to either the hydraulic circuit or the pump, and that distinction determines whether you need a seal kit or a new motor.
The tradeoff between faster engagement and long-term reliability is real. A more aggressive ECU tune will reduce the slip threshold and make the coupling feel more responsive, but faster engagement can produce harsher clutch pulses under certain conditions. For a road car used daily, the factory calibration is usually the right balance. For a track or performance application, a measured tune with documented before/after data is the responsible approach.
Document everything. Before any software change, record the ECU software version and save the original calibration. Before any hardware change, photograph the connector condition and note the DTC state. That record protects you with your insurer, supports any future diagnostics, and gives a technician a clear starting point if the vehicle comes back with a new complaint.
OEM Haldex service kits and parts for UK buyers
Getting the right parts for a Haldex service is straightforward when you know your generation and vehicle. Haldexparts stocks OEM-grade service kits, pump motors, oils, and filters for Audi, VW, Ford, Land Rover, Volvo, Škoda, Seat, Opel, Saab, and Vauxhall applications, with products selectable by vehicle make and Haldex generation. That matters because fitting the wrong oil spec or a mismatched filter is one of the most common causes of post-service performance issues.
When ordering, have your VIN, engine code, transmission code, and Haldex generation to hand. Generation is not always obvious from the VIN alone; the vehicle’s build year and platform usually confirm it, but the product pages on Haldexparts include fitment guidance to help you verify before checkout. For a full coupling service, the Haldex service kits section bundles oil, filter, and seals in one order. If the pump needs attention, the pump motor catalogue covers replacement assemblies by generation and vehicle. Orders over £150 qualify for free UK shipping.
If you are unsure which kit fits your vehicle, contact Haldexparts directly with your VIN and generation details for fitment confirmation before ordering.
Sources
The sources below are worth consulting for specific aspects of Haldex diagnosis and service.
- Haldex Generation V
- Härledning och modellering av drivande delarna i generation V Haldex kopplingen
- New Control Concept for Haldex Limited Slip Coupling
- Haldex Traction — Wikipedia
- All systems go as Haldex put under the spotlight - TPS
The most consistent finding across technical and academic sources is that pump condition and fluid specification are the hydraulic domain’s primary controls on response time. Before any ECU or hardware upgrade, a correct service with generation-specific parts is the highest-confidence first step.



