

Whether your Haldex pump is working can be confirmed in under ten minutes with two electrical readings and a short on-car check. A healthy pump hums briefly at idle, shows 5–8 Ω across its motor terminals, and produces a measurable current spike when triggered via VCDS or OBDeleven. If any of those three signals is absent, you have a clear starting point for further diagnosis.
Quick five-minute checklist:
- Check the 10A pump fuse and confirm the supply feed is intact
- Listen for a brief audible prime within seconds of the engine reaching idle (roughly 400 rpm)
- Measure resistance across the pump motor (V181) terminals: 5–8 Ω is the target range for Gen 4
- Watch for a current spike at the 10A fuse when triggering an output test via OBD
- Perform a slow rolling test and confirm the rear axle engages without hesitation or clunking
If the pump primes audibly and your OBD tool shows current draw, the fault is more likely hydraulic or strainer-related than a dead motor. If the pump is silent and resistance reads open-circuit, proceed to the electrical tests below.
Key takeaways
Testing a Haldex pump correctly requires a visual check, a resistance reading of 5–8 Ω at the motor terminals, and an OBD output test with current monitoring before any part is condemned.
| Point | Details |
|---|---|
| Resistance target | A healthy Gen-4 pump reads 5–8 Ω across the motor terminals; open-circuit means the motor has failed. |
| Current tracing | An amp clamp on the 10A fuse during an OBD output test reveals intermittent faults that resistance alone misses. |
| Gen-5 adaptation | Always clear ECU adaptations and run a relearn after fitting a new pump, or ISF codes will return. |
| Replace filter with pump | Fitting a new pump over a blocked strainer causes rapid failure; always replace the filter and oil together. |
| Haldexparts for UK parts | Haldexparts supplies OEM-grade pumps, oils, filters, and complete service kits for all major Haldex generations with UK delivery. |
Table of Contents
- What tools do you need to test a Haldex pump?
- Visual checks to do before powering the pump
- Step-by-step electrical tests for the Haldex pump (V181) and oil pressure motor (V184)
- On-car functional tests to confirm coupling engagement
- How to use OBDeleven or VCDS for Haldex fault codes and relearn
- How to remove the pump and what you can test on the bench
- What parts to buy in the UK if the pump needs replacing
- How to interpret your results and decide what to do next
- The test sequence that actually saves you money
- OEM Haldex pump kits, delivered across the UK
- Sources
What tools do you need to test a Haldex pump?
Before you start any Haldex pump diagnostic, gather the right kit. Running tests with the wrong tools produces unreliable readings and risks ECU damage.
Essential tools:
- Digital multimeter (auto-ranging, capable of measuring resistance and DC voltage)
- OBD diagnostic tool: OBDeleven (Android/iOS) or VCDS by Ross-Tech (Windows laptop)
- Basic hand tools: sockets, Torx bits, and a drain plug key for the Haldex reservoir
- Trolley jack, axle stands, and wheel chocks
- Inspection torch and nitrile gloves
- Camera or phone to photograph connector pin layouts before disconnecting
Safety checklist before you begin:
- Park on level, firm ground and apply the handbrake
- Chock all four wheels before raising the vehicle
- Disconnect the battery negative terminal when physically removing the pump
- Isolate the 10A Haldex pump fuse before probing live circuits
- Allow exhaust and driveline components to cool before reaching underneath
- Never work under a vehicle supported only by a trolley jack; use axle stands
Pro Tip: An amp clamp (clamp meter) placed around the 10A pump feed wire gives you real-time current draw without breaking the circuit. Pair it with VCDS graphing during an output test and you get a current waveform that reveals intermittent brush faults a static resistance reading will miss entirely.
If you plan to use a workshop lift, follow a proper auto lift safety inspection before raising the vehicle.
Visual checks to do before powering the pump
Catching an obvious fault before you reach for the multimeter saves time and prevents a pointless teardown.
Fluid and leaks:
- Remove the Haldex drain plug and check the oil: dark, gritty, or milky fluid signals contamination
- Look for oil weeping around the pump body, reservoir, or drain plug threads
- A clogged strainer is a frequent real-world failure mode that can burn out a new pump if not replaced; oily scum around the drain port is a warning sign
- Check the fluid level is within the specified range for your generation
Electrical and mechanical:
- Inspect the 2-pin pump connector (V181) and the oil pressure control motor connector (V184) for corrosion, bent pins, or cracked housings
- Trace the wiring loom from the connector back to the AWD control unit (J492) and look for chafing against the subframe or heat shielding
- Pull the 10A Haldex pump fuse and inspect it visually; test continuity with a multimeter
- Check the pump mounting hardware for corrosion or signs of seizure that will complicate removal later
Before disconnecting anything, photograph the connector pin layout and note the wiring colours. The workshop manual for the Volkswagen Golf Mk4 includes current-flow diagrams that show exactly which pin carries supply and which is the return; having that reference open while you probe saves mistakes.
Step-by-step electrical tests for the Haldex pump (V181) and oil pressure motor (V184)
This is where you separate an electrical fault from a hydraulic or mechanical one. Work through the steps in order.
-
Verify fuse and supply voltage. With the ignition on and engine off, back-probe the pump connector supply pin. You should read battery voltage (12–14 V). No voltage here points to a wiring or relay fault upstream of the pump, not the pump itself.
-
Measure motor winding resistance. Disconnect the 2-pin connector at V181. Set your multimeter to resistance (Ω) and probe across the two motor terminals. For Gen 4, the Gen-4 troubleshooting guide states a healthy pump reads approximately 5–8 Ω. An open-circuit (OL) reading indicates a broken winding or failed brushes. A reading close to zero suggests a short to ground.
-
Repeat for V184 (oil pressure control motor). The same resistance test applies. Consult the current-flow diagram for the correct pin assignment; the workshop manual specifies the connector layout for both components.
-
Check for short to ground. With the connector still unplugged, probe each motor terminal against chassis ground. Any reading below 1 MΩ indicates an insulation fault.
-
Run an OBD output test and observe current. Reconnect the connector, start the engine, and trigger the pump via VCDS (Controller 22 → Output Tests → Pump V181) or OBDeleven. With an amp clamp on the 10A feed wire, watch for a current spike. A working pump draws a brief surge on start-up then settles. A flat line means the motor is not turning; an excessively high sustained draw suggests a seized or heavily loaded pump.
-
Cross-check V184 during the same output test. The oil pressure control motor should respond simultaneously. No movement or no current change here can indicate a valve or solenoid issue rather than the pump motor itself.
Pro Tip: Place the amp clamp around the 10A fuse wire before triggering any output test. The Gen-4 technical notes confirm that current tracing at this fuse with VCDS graphing or an oscilloscope is a valid, non-intrusive diagnostic technique. A healthy waveform shows a sharp inrush spike followed by a steady running current; a dead-flat trace with no spike at all is as diagnostic as an open-circuit resistance reading.
On-car functional tests to confirm coupling engagement
Electrical tests tell you whether the motor runs. These tests tell you whether the coupling actually engages under load.
-
Static prime check. Start the engine and let it idle. Within a few seconds of reaching approximately 400 rpm, the controller primes the pump in a short burst. Listen for a faint hum or whirr from the rear of the vehicle. No sound at all, combined with a clean electrical check, points toward a hydraulic fault or a seized pump impeller.
-
Slow rolling engagement test. On a quiet, flat road or car park, accelerate gently from rest. A healthy Haldex system transfers torque to the rear axle smoothly and without hesitation. Clunking, shuddering, or a complete absence of rear-wheel drive feel under load indicates the coupling is not engaging.
-
Engine rev test (static). With the vehicle stationary, handbrake on, and a helper watching the rear prop or coupling, briefly rev the engine to around 2,000 rpm. The pump should prime and the coupling should pre-load. This is a rough check only; it does not replicate real load conditions.
-
Brake roller test. For a conclusive on-car result, a rolling road or brake roller test is the only method that applies real, measured torque to each axle independently. Many UK MOT stations and independent workshops can run this test; it removes all ambiguity about whether the rear wheels are receiving drive.
Pro Tip: The controller primes the pump roughly every 20 seconds at idle to maintain system pressure. If you hear the pump cycle regularly but the coupling still fails to engage under load, the fault is almost certainly hydraulic: a worn pump that cannot build the ~30 bar operating pressure the system needs, or a leaking pressure valve.
How to use OBDeleven or VCDS for Haldex fault codes and relearn
OBD tools are where a Haldex pump diagnostic becomes genuinely precise. Both OBDeleven and VCDS access the AWD controller (address 22) and give you fault codes, live data, and the ability to run the pump on command.
-
Connect your tool and navigate to Controller 22 (AWD). In VCDS, select “Select Control Module” → “22-AWD.” In OBDeleven, go to “All Systems” → “AWD” or “Haldex.”
-
Run output tests. In VCDS: Output Tests → activate V181 (pump motor) and V184 (oil pressure control motor) individually. In OBDeleven, the equivalent is under Actuations. Listen for the pump and watch your amp clamp simultaneously.
-
Check live data. Under Measuring Blocks or Live Data, monitor pump current, system pressure (where available), and AWD engagement status. A pump that runs but shows no pressure build-up confirms a hydraulic rather than electrical fault.
| Fault code | Typical meaning | Recommended action |
|---|---|---|
| C1112 04 | Pump motor open circuit | Check wiring, connector, motor resistance |
| C1112 07 | Pump motor intermittent fault | Bench test, check brushes, warm/cold resistance |
| ISF (Internal System Fault) | Adaptation mismatch or pressure fault | Clear adaptations, run relearn, check pressure |
| Pressure sensor code | Sensor or hydraulic fault | Test sensor separately; check pump pressure output |
For a detailed overview of which OBD tools support which Haldex functions, the Haldex diagnostic tools guide covers OBDeleven and VCDS differences in practical terms.
How to remove the pump and what you can test on the bench
A bench test is worth doing when in-car tests are inconclusive or when you need to inspect the strainer and brushes directly.
-
Isolate the electrical supply. Disconnect the battery negative terminal and remove the 10A pump fuse before touching any wiring.
-
Drain the Haldex fluid. Use the correct drain plug key and collect the oil in a suitable container. Note the condition: dark or gritty oil confirms the strainer needs replacing. The Haldex oil drain guide covers this step in full.
-
Mark orientation before removal. Photograph the pump position, gasket surfaces, and any alignment features. Note the torque settings for the mounting fasteners so reinstallation is correct.
-
Resistance test on the bench. With the pump removed and at ambient temperature, measure resistance across the motor terminals again. Then apply 12 V briefly from a bench supply or jump leads to spin the motor. Measure resistance again immediately after running. Forum evidence from hands-on testing confirms that resistance can fall after a brief run as brushes seat, so a warm reading that differs significantly from the cold reading suggests worn or sticking brushes.
-
Check for seizure. Attempt to rotate the pump impeller by hand. Any resistance beyond light drag indicates internal wear or contamination.
-
Inspect and replace the strainer. A clogged filter strainer is one of the most common causes of pump failure. Fitting a new pump over a blocked strainer will destroy the replacement in short order.
Pro Tip: Never run the pump connected to the ECU during a bench test. Applying 12 V directly to the motor terminals is fine for a rotation check, but feeding the pump through the ECU harness while it is outside the vehicle risks sending incorrect signals to the controller and corrupting adaptation values.
What parts to buy in the UK if the pump needs replacing
Order the correct parts before you start reassembly. A generation mismatch between pump and controller causes persistent fault codes that no amount of adaptation will resolve.
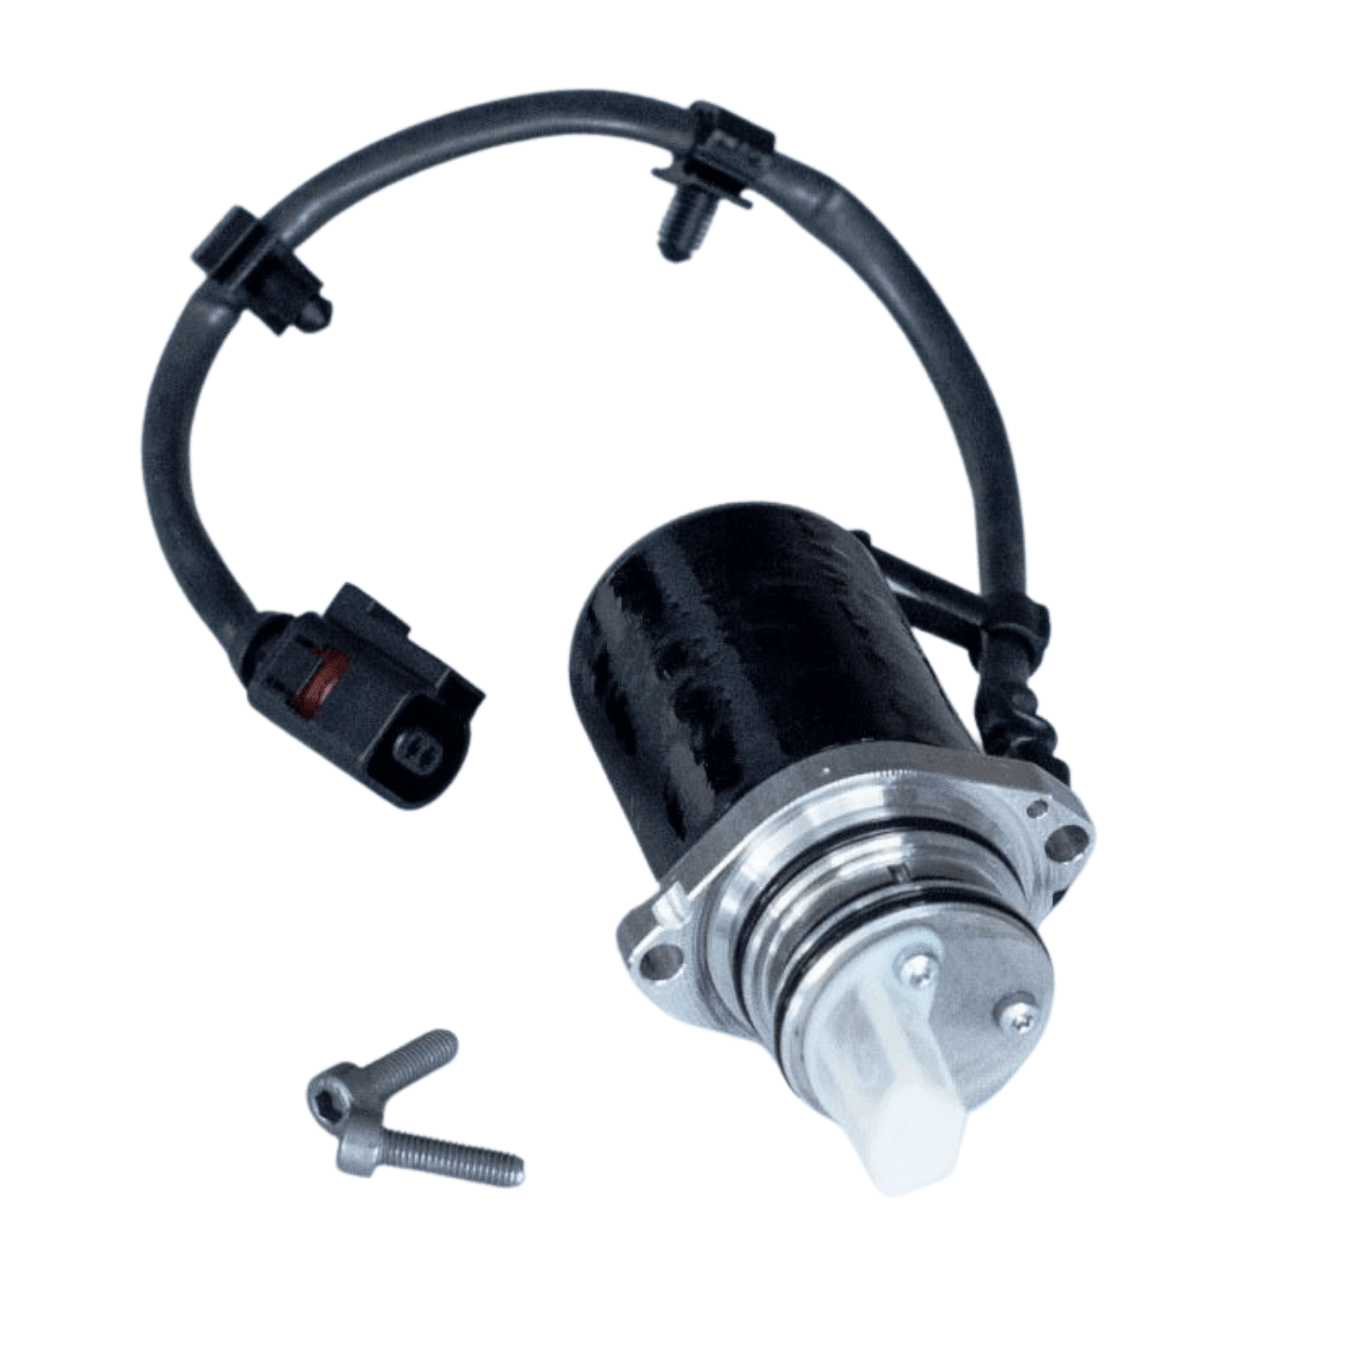
- Match the pump to your Haldex generation. Gen 4 and Gen 5 pumps are not interchangeable. Confirm your generation from the vehicle’s build date, gearbox code, or the part number on the existing pump. The Gen-5 pump guide and the VW Group pump buyer’s guide both cover part-number verification in detail.
- Always replace the filter and oil at the same time. Fitting a new pump without replacing the strainer is one of the most common and costly mistakes. The filter is inexpensive; a second pump replacement is not.
- Buy a complete service kit where possible. A kit that includes the pump, oil, and filter in one purchase removes the risk of ordering mismatched components.
- Check brand compatibility. Haldex systems are fitted across VW, Audi, Škoda, Seat, Ford, Land Rover, Volvo, Saab, Opel, and Vauxhall. The part number varies by model and generation; always verify against your vehicle’s VIN or gearbox code before ordering.
- Ford owners should check the dedicated Ford AWD pump range to confirm fitment, as Ford-specific variants differ from VW Group units.
Haldexparts supplies OEM-grade pumps, oils, filters, and complete service kits for all major Haldex generations, with product pages that include compatibility notes and part-number references.
How to interpret your results and decide what to do next
Most Haldex pump faults fall into one of three categories, and the right action depends on which tests passed and which failed.
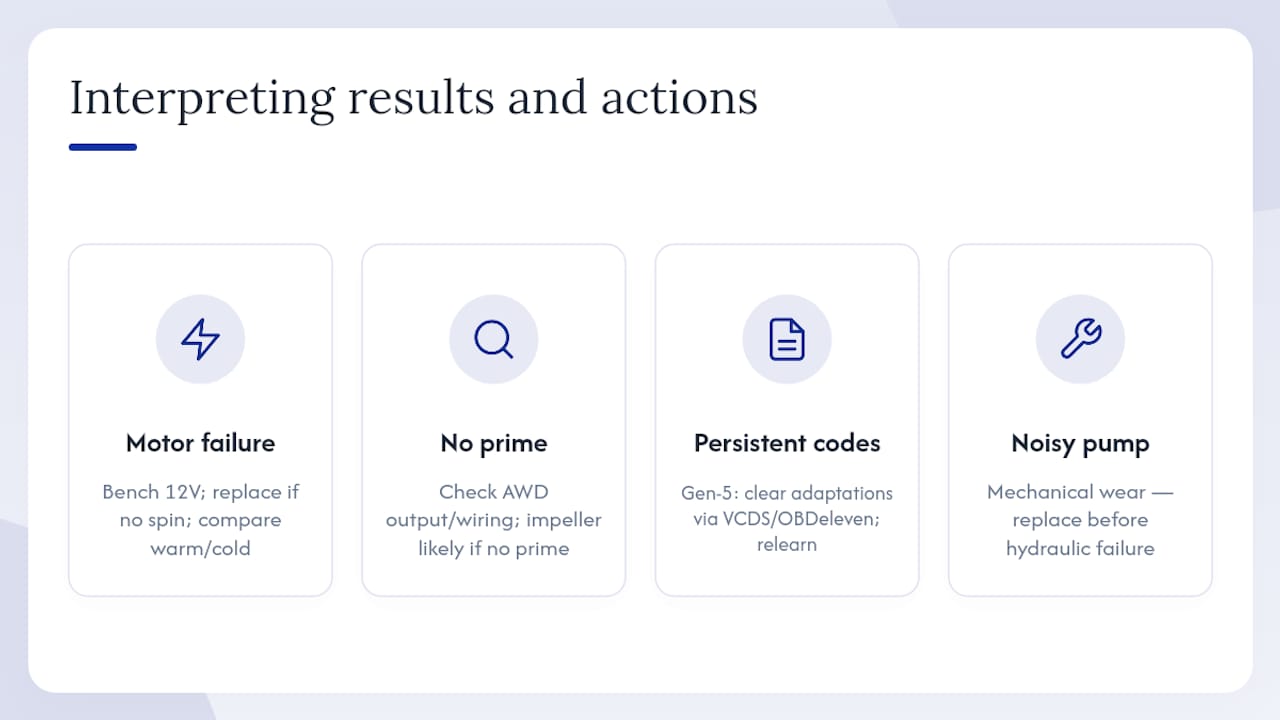
Resistance out of specification (open circuit or near-zero): The motor winding or brushes have failed. A bench test with 12 V will confirm whether the motor rotates at all. If it does not, replacement is the only option. If it rotates but resistance is borderline, check warm vs cold readings before committing to a new pump.
No audible prime, but resistance is in range: The pump motor is electrically intact but not receiving a trigger signal, or the hydraulic side is seized. Check the AWD controller output and wiring first. If the controller fires the output test but the pump still does not prime, the impeller is likely seized.
Fault codes present but pump passes basic tests: On Gen-5 systems, ISF codes often persist after pump replacement because the ECU retains old adaptation values. Clear adaptations via VCDS or OBDeleven and run the relearn procedure before condemning a new pump. The Gen-5 fault guide is explicit on this point.
Noisy pump that passes electrical tests: A pump that whines, rattles, or produces irregular noise but still shows correct resistance and current draw is mechanically worn. It may pass today and fail next month. Replacement is advisable before it causes a hydraulic failure or damages the coupling.
When to seek professional help: Repeated ISF codes after a confirmed adaptation procedure, complex data-bus faults (CAN errors alongside AWD codes), or a coupling that seizes under load all warrant a specialist. A technician’s diagnostic guide covers the more involved wiring and data-bus checks that go beyond DIY scope.
The test sequence that actually saves you money
The standard advice is to start with fault codes and work backwards. That is the wrong order for a Haldex pump.
Fault codes on a Haldex system are often a consequence, not a cause. A pump that has been slowly degrading for 20,000 miles will log an ISF code on the day it finally gives up, but the real story is in the strainer that has been restricting flow for the past two services. Starting with the OBD tool and seeing a C1112 code, then ordering a pump, then fitting it without replacing the filter, then getting the same code back three months later: that is the most common and most expensive mistake in Haldex diagnosis.
The sequence that works is visual first, electrical second, functional third, and bench last. Each step either closes the case or narrows it. By the time you reach the bench test, you should already know whether the fault is electrical, hydraulic, or mechanical. The bench test confirms it; it does not discover it.
The other thing people consistently underestimate is the adaptation step on Gen-5 systems. A new pump fitted without clearing ECU adaptations will produce ISF codes within days. This is not a faulty pump; it is an ECU that has not been told the old values are gone. Two minutes in VCDS or OBDeleven resolves it. Skipping that step costs people a second pump return and a week of confusion.
OEM Haldex pump kits, delivered across the UK
When your tests confirm a pump or service kit is needed, the fastest route to the correct OEM parts is Haldexparts. The product range covers every major Haldex generation across VW, Audi, Škoda, Seat, Ford, Land Rover, Volvo, Saab, Opel, and Vauxhall, with each listing showing the compatible generation and part number so you order the right item first time.
Complete pump, oil, and filter kits are available as a single purchase, removing the risk of mismatched components. Individual replacement pumps, filters, and service kits are listed separately for those replacing one component at a time. Free shipping applies on orders over £150. Browse by vehicle brand or Haldex generation on the product pages, confirm your part number against the compatibility notes, and order directly for UK delivery.
Sources
- Electrical check of Haldex coupling — workshop manual (Volkswagen Golf Mk4)
- Guide To Generation 4 Haldex Troubleshooting (Auto Fault Finder PDF)
- VW Haldex 4Motion Generation IV - Automotive Tech Info
For wiring diagrams specific to your vehicle, a workshop manual subscription (ETKA, ELSA, or equivalent) or a main dealer data session is the most reliable source of current-flow diagrams for your exact model year and gearbox code.



