

Service your Insignia’s Gen‑4 Haldex unit every 20,000 to 30,000 miles with a genuine filter, cover gasket and around 0.85 litres of the correct oil. If the pump stays silent on ignition or the AWD warning light won’t clear, fit a seal kit or replacement pump rather than just refreshing the fluid. Confirm your generation by VIN first, jack the car safely, and have a drain container ready before you crack anything open.
TL;DR:
- Confirm the generation and part fitment of your Haldex unit using the VIN and stamped housing code before ordering parts.
- Service recommendations vary by generation, with Gen‑4 advised every 20,000 to 30,000 miles and Gen‑5 closer to 10,000 miles due to design differences.
- A silent pump, recurring faults, or contaminated oil with metallic debris indicate the need for repair or pump replacement instead of simple fluid refresh.
- Proper assembly with correct torque and sequence prevents cover leaks and ensures reliable operation after servicing.
- Used oil, filters, and gaskets must be disposed of responsibly at authorized facilities to avoid environmental hazards.
Table of Contents
- How to identify your Haldex generation and confirm part fitment
- Signs, symptoms and quick diagnosis of Haldex problems
- Service interval, typical costs and what to budget
- Tools, materials and parts checklist for a Gen‑4 service
- Step‑by‑step Haldex oil, filter and gasket change for Gen 4
- When to replace the pump, clutch pack or reseal the control unit
- Troubleshooting checklist and quick fixes after service
- Expert notes on service intervals, fitment and ordering
- Torque specifications and tightening sequence for assembly
- Post‑service checks and reset procedures
- Detailed troubleshooting of common Haldex issues beyond symptoms
- How to properly dispose of used Haldex fluid and filters
- What the research actually supports about Haldex servicing
- Where to buy the correct parts for your Insignia service
- Sources
How to identify your Haldex generation and confirm part fitment
Guessing your Haldex generation is the single most common reason a DIY order goes wrong. Insignia 4x4 models built across the 2008 to 2017 run typically carry the 4th generation Haldex coupling, but running changes mean two cars from the same production year can still differ in cover shape, filter type, or bolt pattern. Confirming fitment before you buy saves a return and a wasted afternoon under the car.
The reliable method is your vehicle identification number. Supplier listings for Haldex parts consistently tell buyers to confirm compatibility using their VIN or registration before ordering, because unit codes stamped on the housing don’t always match what a parts catalogue assumes for your model year.
Before you order anything, work through this:
- Note your full VIN from the windscreen or door pillar plate.
- Check the Haldex unit code stamped on the housing itself, not just the service manual reference.
- Cross-reference both against the supplier’s fitment tool rather than relying on year alone.
- Confirm oil volume, filter type and gasket profile match your exact unit code, since Gen‑4 variants can differ.
Getting this wrong doesn’t just waste money. The wrong filter can leak, and the wrong oil volume leaves the coupling under filled or overfull, both of which accelerate wear.
Signs, symptoms and quick diagnosis of Haldex problems
An illuminated AWD warning light is the obvious flag, but it’s rarely the first sign. Most owners notice the rear wheels stop contributing under acceleration well before any dashboard warning appears, especially pulling away on a wet road or a gravel drive.
Work through these checks in order before deciding whether a service will fix it:
- Scan for stored fault codes with an OBD reader that supports the AWD control module, not just the generic engine codes.
- Listen for the pump priming itself for a second or two when you turn the key to ignition. Silence here usually points to a pump or wiring fault rather than a fluid problem.
- Check the fluid’s colour and smell when you drain it. Clean amber oil with no metallic sheen suggests contamination isn’t advanced.
- Pull the filter and inspect the magnet for metal particles. Fine metallic dust is normal wear; larger flakes point toward clutch pack degradation.
- Test drive on a loose surface if safe to do so, feeling for rear engagement under moderate throttle.
Contaminated oil and a clogged filter are serviceable faults. A dead pump, a burnt clutch pack, or persistent codes after a fresh service mean you’re looking at repair, not maintenance.
Service interval, typical costs and what to budget
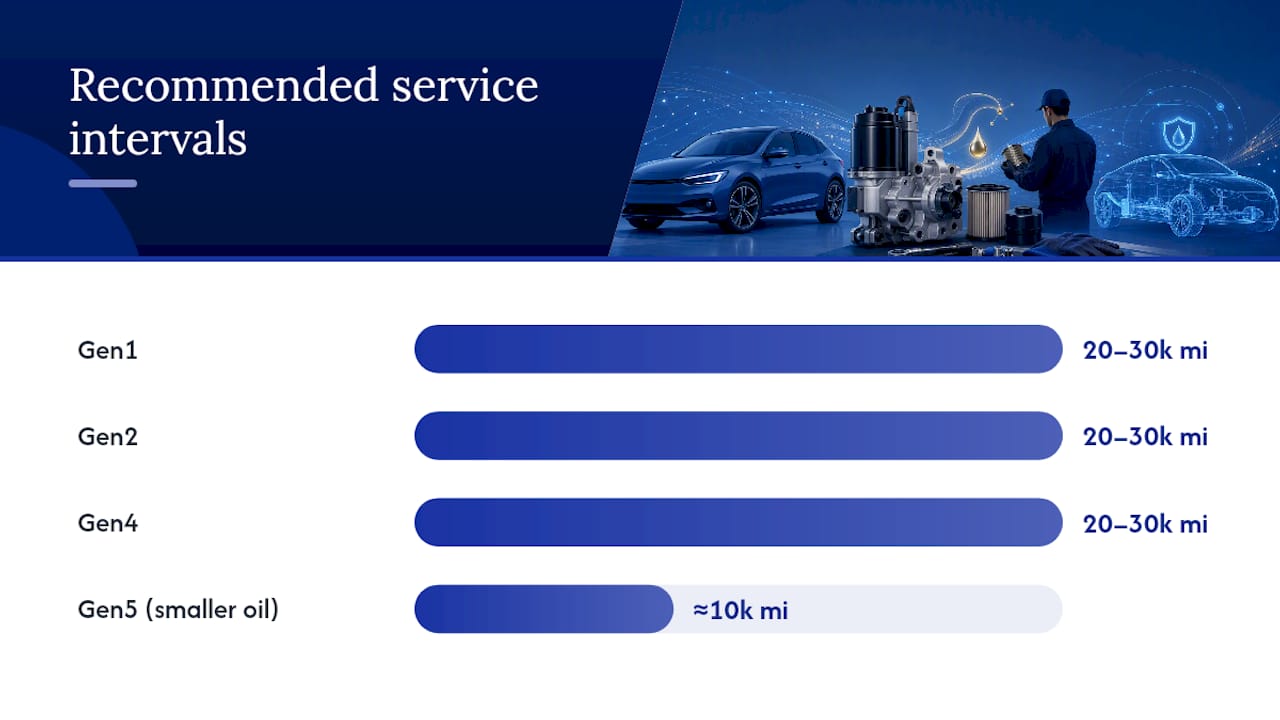
Haldexparts recommends servicing Gen1, Gen2 and Gen4 units every 20,000 to 30,000 miles, while Gen5 units need attention closer to every 10,000 miles. The shorter Gen5 interval comes down to a smaller oil capacity and a filter design that clogs faster under the same mileage.
Statistic: Suppliers pricing Gen‑4 filter and gasket kits note that a clogged or ageing filter is a direct contributor to pump failure, which is the expensive fault this whole interval exists to prevent.
Budgeting realistically:
- A DIY oil, filter and gasket service costs the price of the kit plus your time, typically a fraction of workshop labour.
- Workshop labour adds a set hourly charge on top of parts, since the sump plate and cover need clean removal and correct torque.
- Pump replacement or a clutch pack rebuild costs significantly more in parts and labour than a routine fluid and filter change.
- Some filter kits may carry a core charge if the old unit isn’t returned; check terms before ordering.
Skipping the interval doesn’t save money. It just moves the bill from a filter kit to a pump.
Tools, materials and parts checklist for a Gen‑4 service
Gather everything before you jack the car. Running to a parts shop halfway through with the Insignia on stands wastes an afternoon and invites mistakes.
For a routine Gen‑4 oil and filter service, you need a Haldex‑rated oil, an OEM filter and cover gasket, and a fresh sealing washer for the drain plug. A typical Gen‑4 kit bundles all three, with roughly 0.85 litres of oil included alongside the filter and gasket. If you suspect a leaking seal or pump wear rather than simple contamination, the BorgWarner 4th Gen Haldex repair seal kit covers the resealing job properly rather than papering over a symptom.
Your tool list:
- A fluid transfer pump or syringe for draining and refilling through the small filler port.
- Socket set covering the drain plug, filler plug and cover bolt sizes for your specific unit.
- A torque wrench rated for the low Nm range these fasteners use.
- Axle stands rated for the vehicle’s weight, plus wheel chocks.
- A sealed waste oil container and a supply of clean rags for the inevitable drips.
Pro Tip: Photograph the old filter and any metal debris on the magnet before you dispose of it. If you end up seeking warranty or return support on a pump later, that evidence speeds things up considerably.
Step‑by‑step Haldex oil, filter and gasket change for Gen 4
Working methodically here matters more than working quickly. Follow this sequence.
- Confirm fitment. Recheck your VIN against the kit you’ve bought before touching a spanner. A mismatched filter won’t seal properly and you’ll be doing this twice.
- Prepare the car. Drive it a few minutes first, since slightly warm oil drains faster and more completely than cold oil. Park on a flat, firm surface and chock the wheels.
- Raise and secure the vehicle. Use axle stands rated for the weight, never a jack alone. Give yourself proper access to the rear differential housing.
- Locate the drain and filler plugs. These sit on opposite sides of the Haldex unit housing, typically identifiable by their hex head size.
- Remove the filler plug first, then the drain plug, letting the old oil run fully into your waste container. This can take several minutes on a cold unit.
- Remove the cover bolts and lift the cover away carefully, keeping the old gasket in place until you’re ready to compare it against the new one.
- Inspect the filter and magnet. Fine grey sediment is expected wear. Metallic flakes or chunks suggest clutch pack wear worth investigating further before you reassemble.
- Fit the new filter, seating it exactly as the old one sat, then fit the new cover gasket dry, without sealant unless the kit instructs otherwise.
- Refit the cover and torque the bolts to the manufacturer’s specification in the correct sequence, working in a criss‑cross pattern rather than round the circle.
- Refit the drain plug with a fresh sealing washer, then refill through the filler port with the correct oil volume for your unit.
- Prime the pump by cycling the ignition on and off a couple of times without starting the engine, listening for the pump engaging each time.
- Refit the filler plug, start the car, and let it idle briefly before a short test drive on a surface where you can feel rear engagement.
- Clear any stored fault codes with your scan tool once you’ve confirmed no fresh codes appear.
Statistic: Warming the vehicle slightly before draining and priming the pump properly during refill both reduce trapped air, which is a common cause of a persistent AWD fault that survives an otherwise correct service.
When to replace the pump, clutch pack or reseal the control unit
A service that doesn’t fix the symptom is telling you something. If the pump stays silent during priming, if the AWD fault returns within days of a fresh fluid change, or if you found chunks of metal rather than fine sediment on the filter magnet, you’re past routine maintenance.
The BorgWarner OEM control unit resealing kit suits 2nd and 3rd generation units showing seal leaks without pump failure, a job well within reach for a confident home mechanic with a free afternoon. Full pump failure is a different job entirely: the pump provides the hydraulic pressure that engages the coupling, and a dead pump means no rear drive at all until it’s replaced.
- Reseal jobs typically take an hour or two and need basic hand tools.
- Full pump or clutch pack replacement takes considerably longer and rewards prior mechanical experience.
- Persistent faults after correct servicing, or unfamiliar noises from the differential housing, are worth a specialist’s second opinion before you commit to parts.
Where factory clutch plates are hard to source, aftermarket rebuild packs exist specifically for the Insignia’s AWD clutch pack as a practical alternative.
Troubleshooting checklist and quick fixes after service
Don’t put the car away the moment the last bolt is tight. Run through these checks while it’s still on stands.
- Check the cover and drain plug for weeping oil after a few minutes idling, since a slow leak often only shows up once the unit’s warmed through.
- Recheck the oil level through the filler port, topping up if it’s dropped below the correct mark.
- Drive the car and deliberately test AWD engagement on a loose or wet surface, feeling for rear wheel contribution under moderate acceleration.
- Rescan for fault codes, confirming nothing new has appeared and nothing old has stubbornly returned.
If you spot a leak, it’s usually one of two things: an under torqued cover bolt or a missing sealing washer on the drain plug. Both are five-minute fixes. If the AWD fault reappears despite a clean service, suspect trapped air and re‑prime the pump again through a few ignition cycles before assuming the worst.
Pro Tip: If a code won’t clear no matter how many times you cycle the ignition, stop guessing and get it read properly on a diagnostic tool that shows live AWD control module data, not just a generic reader.
Persistent codes after two proper attempts, or a rear differential that stays quiet under load, mean it’s time to book a specialist rather than keep chasing the fault yourself.
Expert notes on service intervals, fitment and ordering
Haldexparts holds to the 20,000 to 30,000 mile window for Gen1, Gen2 and Gen4 units, tightening to roughly 10,000 miles for Gen5, because later generations run tighter oil capacities that clog faster under contamination. That’s a maintenance interval built on how the hardware behaves, not an arbitrary manufacturer figure.
Mindaugas’s guidance for readers ordering parts is consistent: check the VIN against the site’s fitment tool before you buy, every time, even if you’ve ordered for this exact car before. Running changes within a single generation catch out even experienced owners.
Torque specifications and tightening sequence for assembly
Overtightening a Haldex cover is a genuinely common mistake, and it’s an expensive one. The housing is aluminium, and the bolt bosses strip far more easily than most people expect from a component sitting under a car.
Manufacturer torque figures for Haldex cover bolts sit in a low Nm range, well below what you’d apply to a wheel bolt or a sump plug on the engine. Always check the specific figure for your generation and unit code rather than assuming a universal number, since Gen‑4 covers and older Gen‑2 housings don’t share identical bolt specifications.
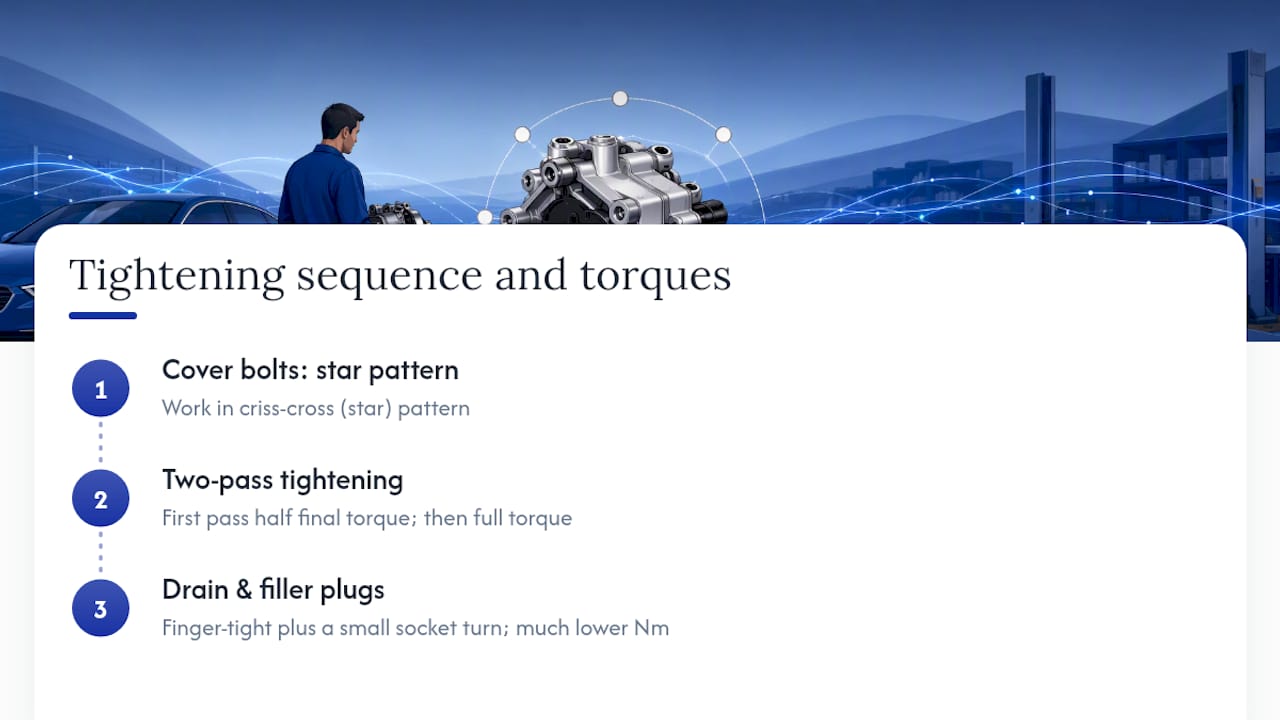
The sequence matters as much as the figure itself. Work in a criss‑cross or star pattern across the cover bolts, tightening each one to perhaps half the final torque on a first pass, then coming back round to bring every bolt up to full spec on a second pass. This spreads clamping pressure evenly across the gasket and avoids the cover distorting on one side while the other stays loose, which is exactly how a slow oil leak starts a few hundred miles later.
The drain plug and filler plug get their own, much lower torque figure, typically finger tight plus a modest turn with a socket. These sit against a soft sealing washer rather than a gasket, and overtightening here strips the housing thread rather than improving the seal. If you’re at all unsure of a figure for your specific unit, the safer course is snug plus a small additional turn rather than cranking down with full force on an aluminium housing you can’t easily replace.
Post‑service checks and reset procedures
The job isn’t finished when the last bolt is torqued. A proper post‑service routine catches the small mistakes before they become a breakdown three weeks later.
Start with a static check while the car’s still raised. Look along both the cover seam and around the drain and filler plugs for any sign of weeping oil, ideally after the unit has had a few minutes to warm through on idle. A dry housing after ten minutes is a good sign; any wetness means a bolt needs another quarter turn or a washer needs replacing.
Bring the car down off the stands and recheck the oil level through the filler port once it’s settled, since a level that looked correct with the car raised can read differently once it’s sitting level on its wheels. Top up if needed rather than assuming it’s fine.
Clear any fault codes that were stored before you started, using your scan tool, and then take the car for a proper test drive rather than just a lap of the block. Find a stretch of loose gravel, a wet roundabout, or any surface where you can feel the rear wheels contribute under moderate acceleration. That’s the real test of whether the service has restored proper AWD behaviour.
Rescan for codes once you’re back. A completely clean scan after a genuine test drive is the result you’re after. Anything that reappears within the first few miles is worth investigating immediately, not waiting to see if it goes away.
Detailed troubleshooting of common Haldex issues beyond symptoms
Surface symptoms only tell part of the story. A few faults deserve a closer look because they’re easy to misdiagnose.
Intermittent AWD engagement that comes and goes rather than failing completely often points toward a wiring or connector issue at the control module rather than a mechanical fault inside the unit itself. Before you assume the pump or clutch pack is failing, check the electrical connector for corrosion and confirm the earth strap is solid. It’s a far cheaper fix than a pump replacement, and it’s frequently overlooked because everyone assumes AWD faults live inside the differential housing.
A whining or grinding noise specifically under acceleration, rather than a constant hum, usually means clutch pack wear rather than a pump problem. The pump itself tends to run quietly; noise under load is a mechanical symptom from the coupling plates themselves.
Oil that comes out looking milky or emulsified rather than simply dark suggests water contamination, which points toward a failed seal allowing moisture ingress rather than routine wear. That’s a reseal job, not a fluid change, and refilling with fresh oil without addressing the seal just repeats the problem within a few thousand miles.
A fault that clears immediately after a service but returns within a very short mileage, sometimes under 100 miles, usually means trapped air rather than a genuine mechanical fault. Re‑priming the pump through several ignition cycles resolves this far more often than people expect.
How to properly dispose of used Haldex fluid and filters
Used Haldex oil is a mineral oil product and counts as controlled waste. It cannot go down a drain, into general household rubbish, or onto soil, and doing so is both an environmental hazard and, in most areas, a legal offence.
Drain the old oil directly into a sealed, clearly labelled container rather than an open tray you’ll transfer from later, since spills and cross contamination with other fluids make disposal harder and can void recycling acceptance. Most local councils operate household waste recycling centres that accept used engine and gear oils free of charge, and many independent garages and quick fit chains will also take a small quantity of used oil even if you didn’t buy parts from them.
The old filter is typically saturated with oil and should go into the same waste stream rather than general rubbish, ideally bagged separately to avoid contaminating other recyclables. If the filter shows unusual metal content that you’re using as evidence for a warranty claim, photograph it thoroughly before disposal, since most suppliers won’t accept a return once the part itself has been discarded.
The old sealing washer and gasket are generally safe for standard metal or general waste recycling once wiped free of oil, but check your specific council’s guidance if you’re unsure, since acceptance rules vary by area.
What the research actually supports about Haldex servicing
The conventional advice treats every Haldex service the same: drain it, refill it, done. That’s not quite right, and it’s the gap that catches out a lot of otherwise competent DIYers. The interval isn’t a fixed number across every Insignia on the road. It’s a function of your specific generation, and Gen5’s tighter 10,000 mile window versus Gen1/2/4’s 20,000 to 30,000 mile range exists because the hardware genuinely behaves differently under contamination.
Where most guides fall short is treating the filter as an afterthought to the oil change. It isn’t. A clogged or ageing filter is a documented contributor to pump failure, which means the £30 to £50 part you skip inspecting is directly linked to the several hundred pound repair you might face later.
What should come first, always, is the VIN check. Not the tools, not the oil, the VIN. Every fitment mistake this article covers traces back to skipping that one step. Get the generation and unit code confirmed before you spend a penny on parts.
— Mindaugas
Where to buy the correct parts for your Insignia service
Sourcing the right kit matters more than sourcing the cheapest one, especially on a system where the wrong filter or an under filled reservoir shortens the life of the pump you’re trying to protect.
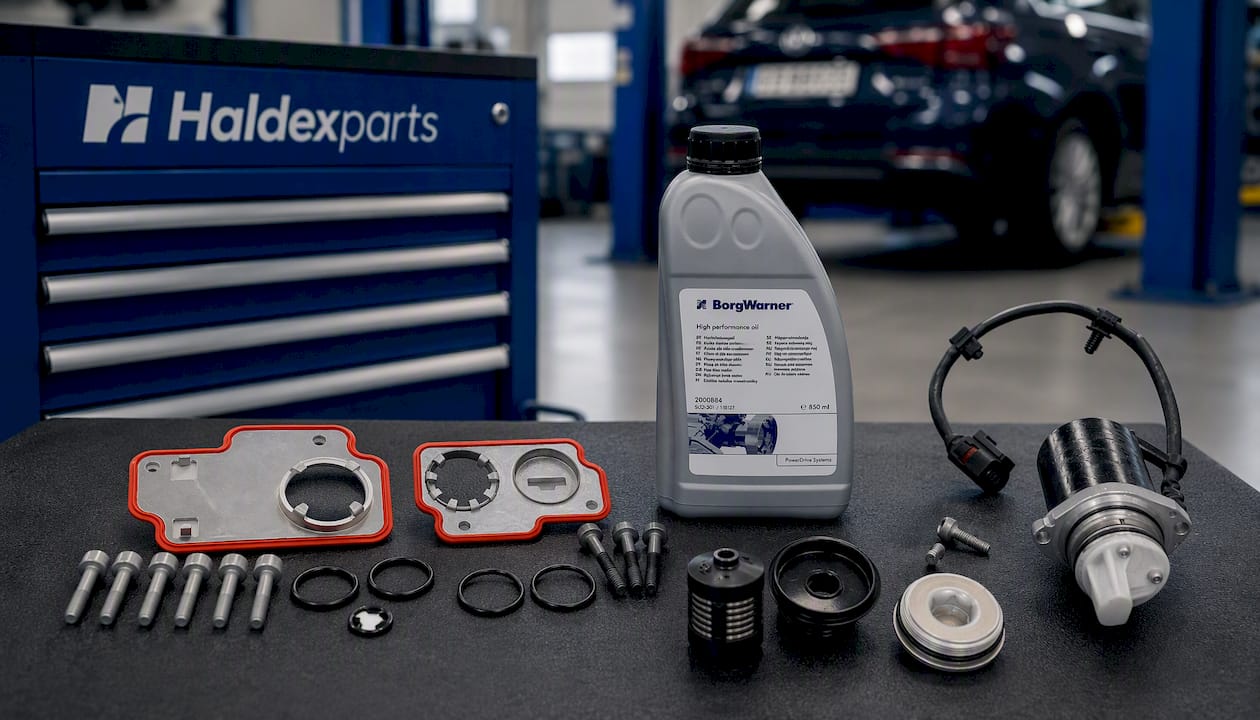
For a straightforward routine service, the pump, filter and oil kit covers a complete refresh in one order rather than sourcing components separately. If you’ve diagnosed a seal leak rather than pump failure, the BorgWarner 4th Gen repair seal kit resolves it without the expense of a full pump. And for older control units showing similar leak symptoms, the 2nd and 3rd generation resealing set is the OEM answer rather than a generic seal substitute.
Every listing on Haldexparts carries the OE reference numbers and generation notes needed to match your VIN check against the correct part, browsable across the full range of service kits. Some orders over a certain amount may qualify for free shipping, and product pages often include fitment details to help distinguish between kits. Check your VIN, confirm the generation, and place the order for the parts your service actually needs.
Sources
For deeper technical detail beyond this guide, the pump diagnostic walkthrough covers testing procedures step by step, while the pump repair guide details replacement time estimates for Gen4 and Gen5 units. Supplier listings referenced throughout, including filter kit specifications and OE reference numbers, document exact part compatibility for further verification.
- Haldex Filter Kit Gen 4 AWD Opel SAAB Vauxhall 04 03 012 / 20986573 – Eco Torque
- Opel/Vauxhall Insignia AWD (4x4) Haldex and rear eLSD rebuild kit - RacingDiffs



