

If your Haldex all-wheel-drive system won’t engage, the fault is almost always one of three things: a hydraulic supply problem (low or contaminated oil, a blocked filter), a failing pump motor, or an electrical fault between the module and the pump. Contamination and filter blockage cause the majority of the engagement complaints workshops see, particularly on cars that have never had the coupling oil changed.
The fastest way to narrow it down without booking a shop:
- Listen for the pump. A healthy Haldex pump makes an audible whir when you start the engine and again briefly under load. Silence usually points to electrical or motor failure.
- Plug in Ross-Tech VCDS and check Address 22 measured values. Pump duty cycle, current draw and wheel speed comparison tell you far more than a dashboard warning light ever will.
- Check for leaks and connector corrosion around the pump housing and under the rear seats, where the wiring loom often lives.
Pro Tip: Before you touch anything mechanical, pull any stored fault codes with VCDS and write down the exact Address 22 readings. That fifteen minutes of logging saves a specialist an hour of re-diagnosing what you already know.
Key Takeaways
Most Haldex engagement failures come down to contaminated oil, a blocked filter, or a failing pump motor, and VCDS Address 22 readings identify which one within minutes.
| Point | Details |
|---|---|
| Start with sound and sight | Listen for the pump and check connectors before reaching for diagnostic tools. |
| VCDS Address 22 is decisive | Pump duty cycle and current draw readings distinguish hydraulic, electrical and pump faults quickly. |
| Adaptation is mandatory after pump swaps | Skipping the pump-learn routine leaves ISF codes even with a brand-new pump. |
| Gen 5 has no external filter | Contamination on Gen 5 units usually means a fuller pump or seal kit service, not a simple filter change. |
| Haldexparts supplies the fix | Once diagnostics point to oil, filter or pump failure, Haldexparts stocks generation-matched OEM-spec service kits and pumps to match. |
Table of Contents
- Why is my Haldex not engaging?
- What quick checks can I run myself?
- How do you diagnose a Haldex engagement fault step by step?
- What are the most common causes and fixes?
- What do common Haldex fault codes mean?
- How do you reset or relearn a Haldex pump?
- How often should Haldex fluid and filters be serviced?
- When should you replace or rebuild the pump?
- Which parts do you need if diagnostics point to the pump or oil?
- Quick-reference troubleshooting checklist
- When should you call a specialist instead of continuing DIY?
- A specialist’s take on Haldex diagnosis
- If you need parts: trusted Haldex service kits, pumps and oils
- Sources
Why is my Haldex not engaging?
A Haldex coupling that won’t engage almost always falls into one of four camps: the pump isn’t building pressure, the fluid or filter is too dirty to let it build pressure, the wiring or module isn’t telling the pump to run, or the clutch pack inside the coupling has worn out. Around three-quarters of the engagement failures reported to specialist workshops trace back to contaminated oil or a blocked mesh filter starving the pump of clean fluid, rather than a genuinely dead unit.
The symptoms tend to cluster:
- No rear drive at all under hard acceleration, with the car behaving purely front-wheel drive. Points towards pump failure or a total electrical fault.
- Intermittent engagement that comes and goes with speed or temperature. Often oil contamination or a marginal connector.
- Whining from the rear without any actual torque delivery. The pump is running but starved of usable pressure, usually filter or fluid related.
- Binding or hop in tight, low-speed turns, which suggests the clutch pack is dragging rather than releasing cleanly.
- ABS or ESP warnings appearing alongside AWD faults, since wheel speed mismatch during a hoist test can trigger stability intervention even when the underlying issue is purely hydraulic.
A silent pump with no whine at all is a different animal to a pump that whines but delivers nothing. Treat those as separate diagnostic paths from the start.
What quick checks can I run myself?
Before you go near VCDS or a hoist, run through checks that need no tools beyond a torch and a multimeter. Disconnect the battery earth lead before touching any connectors, and never work under a car supported only by a jack.
- Start the engine and listen for the pump cycling. It should run briefly on start-up and again under acceleration.
- Look underneath for oil staining around the pump and coupling housing. A slow leak explains low pressure faster than any electronic test will.
- Pull back the rear seat base and inspect the wiring connector for corrosion or a loose pin. This spot causes more intermittent faults than any other single point in the system.
- Check the fuse box for the AWD control module fuse. A blown fuse mimics a dead pump perfectly.
If the pump is silent, connectors are clean, and fuses are intact, that’s your cue to stop guessing and move to VCDS. If you find visible leaks, burnt connectors, or a pump that won’t spin at all, that’s your cue to book a specialist rather than keep working through it alone.
Pro Tip: A cheap automotive multimeter and a torch solve more Haldex mysteries than any forum thread. Check resistance across the pump connector before you assume the motor itself has failed.
How do you diagnose a Haldex engagement fault step by step?
Work through the checks in this order. Each step rules out a category of fault before you spend money on the next one.
- Check power supply. Confirm the AWD fuse and any relevant relay are intact and delivering full battery voltage to the pump connector.
- Test connector continuity. Wiggle-test the loom under the rear seats while watching for voltage drops or intermittent contact.
- Measure pump motor resistance. Healthy Haldex pump motors typically read around 5 to 8 ohms across the windings; a reading well outside that range points to worn brushes or a failing motor.
- Read live VCDS Address 22 values. Watch pump PWM percentage, current draw and wheel speed comparison as you rev the engine and gently apply throttle. Values that refuse to move, or that flicker erratically between readings, suggest a network communication fault that needs fixing before you chase the pump any further.
- Run a hoist test, then a road test. A raised hoist lets you watch wheel speed changes cleanly, but ABS intervention can mask genuine engagement events, so treat the hoist as a first pass rather than the final word. A dynamic road test under light, steady throttle confirms what the hoist can only suggest.
Keep the parking brake engaged, the vehicle properly immobilised, and a second person present for any road or hoist test involving throttle input. Electric parking brakes on some models release automatically in gear, so confirm the handbrake status before anyone stands near a wheel.
Pro Tip: If Address 22 digits jump around erratically rather than responding smoothly to throttle, that’s a controller communication fault, not a pump fault. Fix the network issue first or you’ll chase the wrong problem for hours.
What are the most common causes and fixes?
Most engagement failures sort into four categories, each with a different repair path and a different price tag.
- Clogged filter or degraded oil (low cost). Fine metal particles and clutch dust accumulate in the pump’s mesh screen over time, starving the pump of clean fluid. Fix: flush the system and fit a full service kit with fresh OEM-spec oil and a new filter.
- Burnt-out pump motor (medium to high cost). Worn brushes or a seized commutator stop the pump drawing current altogether. Fix: rebuild where kits allow, or replace the pump outright.
- Electrical or module fault (low to medium cost). Corroded connectors, a blown fuse, or a genuine ECU fault stop the signal reaching the pump. Fix: repair wiring, replace the fuse, or in rare cases the control module itself.
- Worn clutch pack inside the coupling (high cost). Age and heat cycling wear the friction plates, so even a perfectly healthy pump can’t transmit torque. Fix: full coupling rebuild or replacement.
Generation matters here. Gen 4 units have a removable filter cartridge that owners can service directly, while Gen 5 units have no external replaceable filter at all, which pushes contamination problems towards a fuller pump or seal kit service rather than a simple filter swap.
What do common Haldex fault codes mean?
A handful of codes account for most engagement complaints logged with VCDS. Record the exact code and the surrounding measured values before you clear anything.
- C1112 (internal system fault, ISF) typically points to a damaged pump or a controller that hasn’t completed its adaptation routine correctly.
- 01324, AWD control module communication fault, suggests wiring or network issues between the module and the rest of the vehicle’s systems rather than a mechanical pump problem.
- Pump overcurrent or undercurrent codes usually confirm what a resistance test already suggested: a struggling or seized motor.
Before booking a shop:
- Photograph or export the full fault code list.
- Record Address 22 live values during a short throttle test.
- Note whether codes return immediately after clearing, since an ISF code that persists after a pump has already been replaced almost always means the adaptation procedure was skipped rather than a second faulty pump.
How do you reset or relearn a Haldex pump?
After fitting a new pump, the controller needs to relearn its correct supply and current values, or the same fault codes will simply reappear.
- Confirm the vehicle is stationary, parking brake engaged, ignition on and engine off before starting the VCDS session.
- Run the pump-learn adaptation channel through VCDS following the routine for your specific Haldex generation.
- Start the engine and let it idle without revving beyond the instructed range while the adaptation completes.
- Confirm with a short hoist or road test that pump current stabilises and no ISF code returns.
If codes reappear straight after a completed adaptation, that’s a module or power supply fault, not a pump problem, and it’s the point to stop the DIY attempt.
Pro Tip: A successful adaptation shows steady, settled pump current in Address 22 rather than a value that keeps drifting. Drift after adaptation means look at the wiring, not the pump.
How often should Haldex fluid and filters be serviced?
“Sealed for life” is marketing language, not engineering reality, particularly once a Gen 4 or Gen 5 unit passes 40,000 miles. Regular oil and filter changes are the single cheapest way to avoid an engagement failure altogether.
- Use OEM-spec coupling oil matched to your generation, never a generic differential fluid substitute.
- Gen 4 units use a removable mesh filter that should be changed alongside the oil; Gen 5 units rely on internal filtration built into the pump assembly, so a full pump, oil and filter kit covers contamination more completely.
- Watch for early pump whine, since it’s often the first audible sign of contamination well before engagement actually fails.
- Check rear seat connectors during any service visit, and keep a simple log of when oil, filters and pumps were last changed.
The AWD service best practice guide covers full interval recommendations by generation.
When should you replace or rebuild the pump?
Replace, don’t rebuild, when the motor windings test well outside the normal resistance range, when the clutch pack shows contamination damage, or when ISF codes persist after a correctly completed adaptation. Rebuilding suits cases where the pump housing and motor are sound but seals have failed and are causing a slow leak.
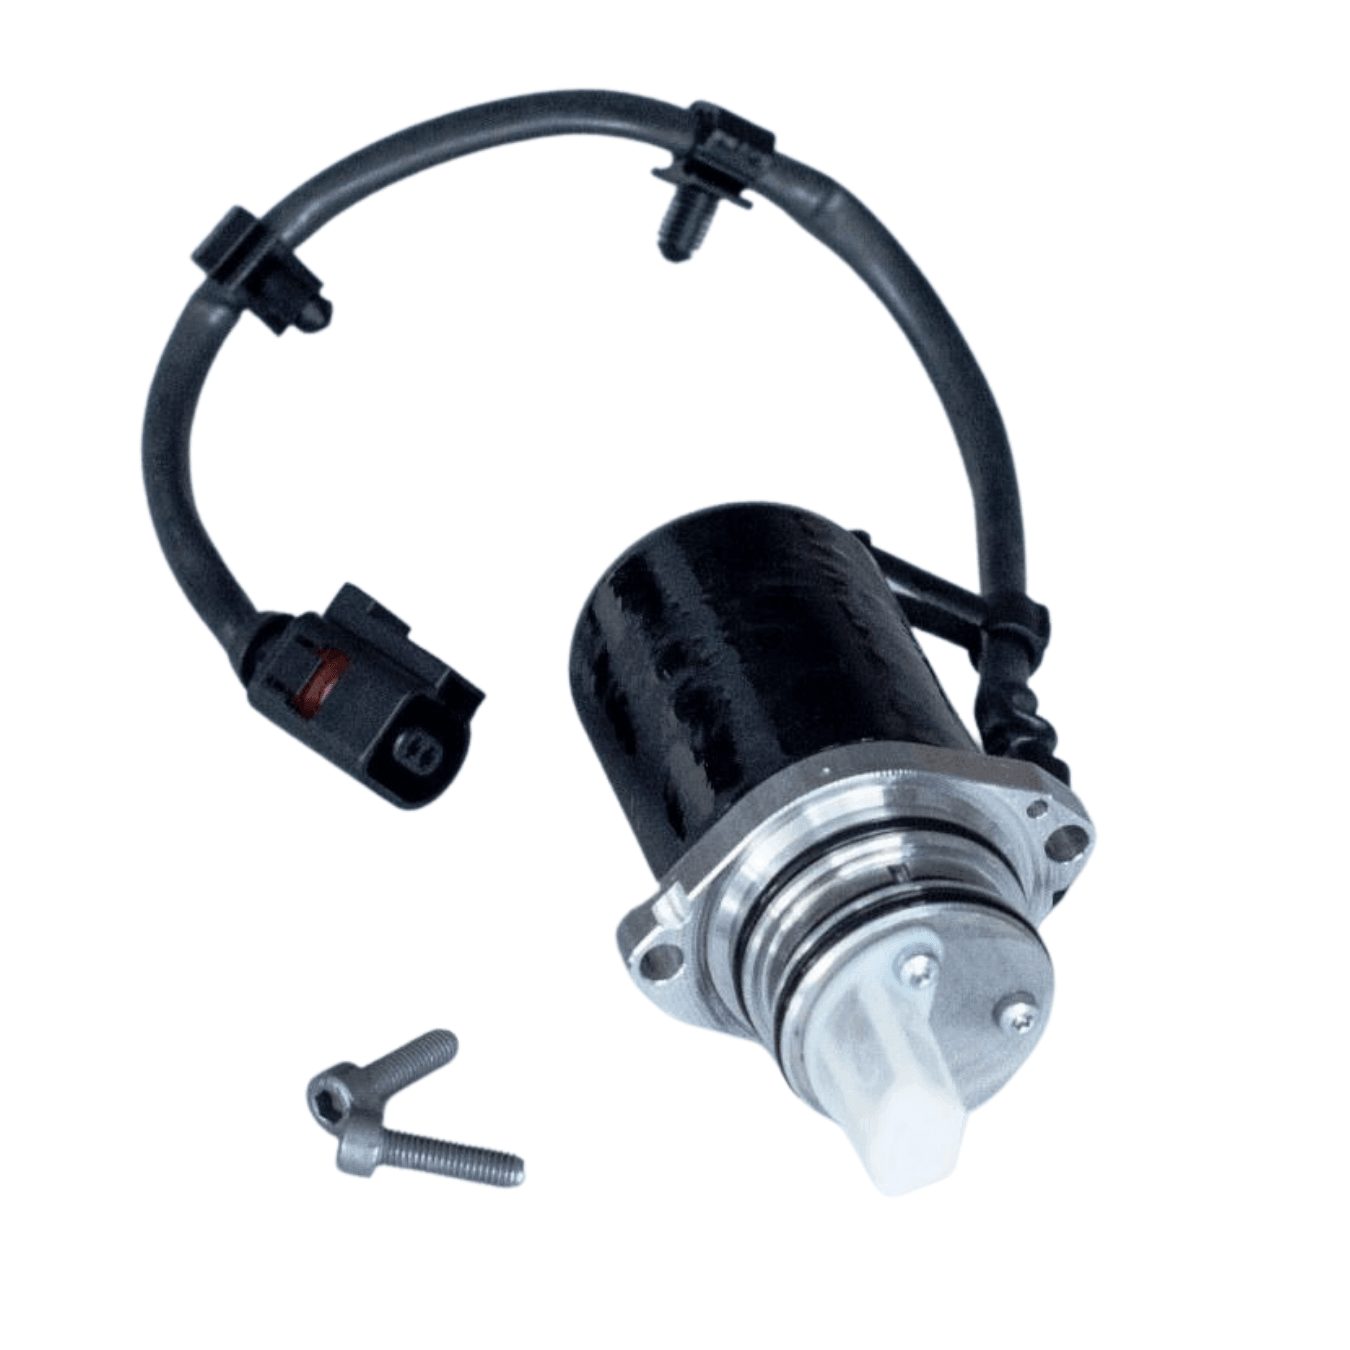
Realistic ranges: a DIY oil and filter service typically runs to a single afternoon and the cost of a kit. A pump rebuild or replacement, including adaptation, is a half-day job for a competent DIYer with VCDS access, or a same-day shop visit. ECU-level faults or persistent communication errors can extend diagnosis into multiple visits if the module itself needs attention.
After any repair, rerun the Address 22 checks and a short road test. Confirmed pump current stability and consistent wheel speed behaviour under light throttle are your proof the repair actually worked, not just that the code cleared.
Which parts do you need if diagnostics point to the pump or oil?
Once you’ve confirmed the cause, order generation-matched parts rather than a generic substitute:
- OEM-spec coupling oil, matched exactly to your Haldex generation.
- Filter kits for Gen 4 units with a removable mesh cartridge.
- Pump seal kits for units with a leak but a sound motor.
- Complete pump units where the motor itself has failed.
Confirm your vehicle’s make, model and Haldex generation before ordering. Haldexparts lists exact part numbers and generation compatibility on every pump collection and service kit page, so check fitment against your VIN or existing part number rather than guessing from the vehicle badge alone.
Quick-reference troubleshooting checklist
- Secure the vehicle, disconnect the battery earth before touching connectors.
- Listen for pump operation at start-up and under light throttle.
- Check fuses and inspect wiring under the rear seats.
- Read VCDS Address 22 live values during a throttle test.
- Bench-test pump motor resistance if the pump is silent.
- Run the pump-learn adaptation after any parts replacement.
- Order matching oil, filter, seal or pump parts based on what the tests showed.
Photograph every VCDS screen along the way. It turns a vague forum question into a five-minute shop diagnosis.
When should you call a specialist instead of continuing DIY?
Stop and book a shop if ISF codes return after a completed pump replacement and adaptation, if the pump draws no current at all despite good power supply, if the module won’t communicate with VCDS, or if a hoist test reveals wheel behaviour that feels genuinely unsafe.
Bring your VCDS logs, the exact Address 22 values you recorded, a written symptom timeline, and any parts already replaced. A specialist will typically repeat live pump current logging, bench-test the motor, and rerun adaptation checks, so arriving with your own data cuts straight to the actual fault.
Pro Tip: Shops charge for diagnostic time as much as parts. A folder of your own VCDS screenshots can shave a genuine hour off the bill.
A specialist’s take on Haldex diagnosis
Most owners replace the pump first and check the oil second, when it should be the other way round. Haldexparts sees far more cases solved by a proper flush and a fresh OEM-spec kit than by a brand-new pump fitted onto contaminated fluid.
If you need parts: trusted Haldex service kits, pumps and oils
Haldexparts stocks OEM-grade Haldex pumps, oils, and filters matched by brand and generation, so once you know the fault, you’re ordering the correct part on the first try rather than guessing from a part number forum thread.
Confirm your vehicle’s make, model, year and Haldex generation before ordering, since Gen 4 and Gen 5 parts are not interchangeable. Browse the full service kits collection for oil, filter and seal bundles, or head straight to the pump collection if diagnostics point to motor failure. Orders over £150 ship free, and every listing carries generation and fitment details so you’re not left checking twice. Check your fitment now and get the right kit on its way.
Sources
- VW Haldex 4Motion Generation IV
- VW, Audi, Skoda, Seat: 5th-Generation Haldex – Details and Common Faults - Haldex Service
- Haldex problems in VW & Audi vehicles – Diagnosed & repaired by Brisbane’s Haldex specialist - West End Service Centre



