

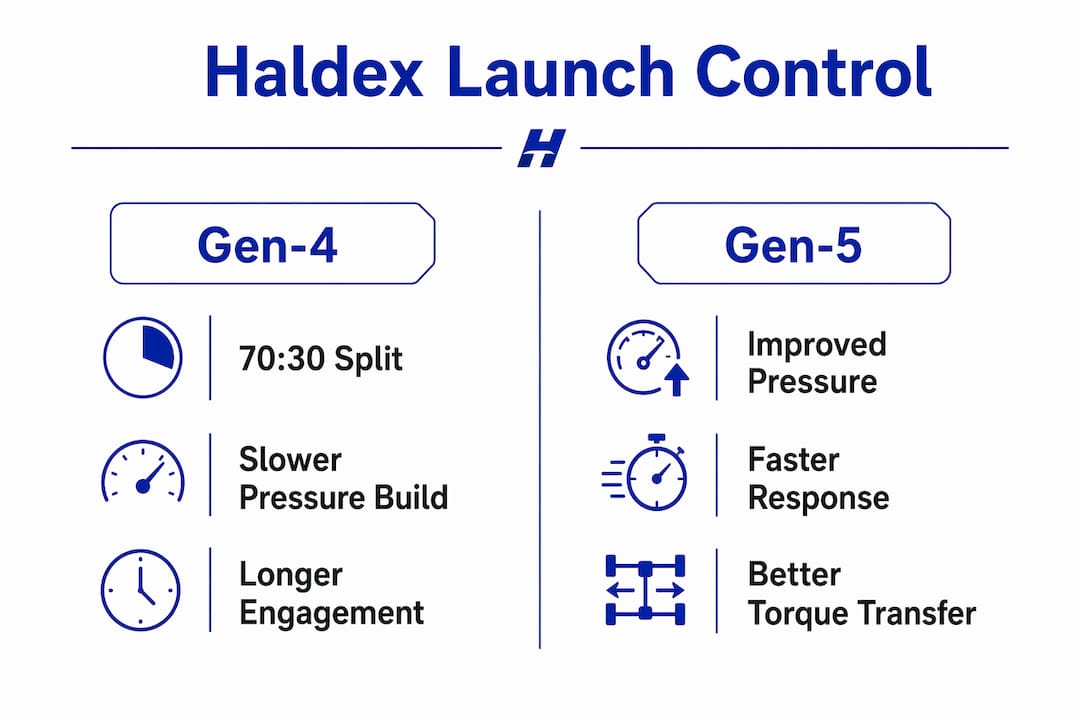
Haldex directly shapes how torque reaches your rear wheels during a launch, and yes, it can cause front-wheel slip even on a fully functional car. The system’s predictive logic pre-charges the clutch before wheelspin occurs, but factory software maps deliberately bias torque toward the front axle, around 70% front to 30% rear under hard acceleration. That conservative split is by design, not a fault, and understanding the difference between expected slip and a genuine hardware problem is what separates a wasted workshop bill from a properly sorted AWD system.
Quick checks you can do right now:
- Check your Haldex oil level and age. Degraded fluid reduces clutch clamping pressure and is the single most common cause of inconsistent engagement.
- Connect VCDS or an OBD-II tool and read Address 22 (Haldex controller). Watch pump duty cycle and measured clutch pressure at idle and under load.
- Note whether slip is brief and consistent (normal factory behaviour) or sustained and variable (potential fault).
When to book a workshop visit:
- Pump duty is high but measured torque transfer is low, suggesting hydraulic restriction or worn friction plates.
- Engagement is intermittent across multiple launches under identical conditions.
- You see fault codes for the N373 valve or pump motor alongside real-world symptoms.
Table of Contents
- How does Haldex Gen-4 and Gen-5 actually behave during a launch?
- Why does front-wheel slip still happen with launch control active?
- How do you diagnose a Haldex fault versus normal behaviour?
- What tuning and hardware changes actually improve launch performance?
- How do you set up and drive for consistent launches?
- Key takeaways
- The part most people get wrong
- OEM Haldex service parts, delivered across the UK
- Useful sources and further reading
How does Haldex Gen-4 and Gen-5 actually behave during a launch?
The key shift between generations is how quickly the system can build clutch pressure, and that directly determines how Haldex affects launch control response.
The signal chain from throttle to clutch
When you activate launch control, the Engine Control Module (ECM) broadcasts torque demand across the CAN bus to the J492 Haldex controller. The J492 doesn’t wait for wheelspin to appear. It pre-charges the pump so the clutch plates are already building pressure before the car moves. This predictive strategy is what separates modern Haldex from older reactive systems, where rear engagement only happened after the front wheels had already broken traction.
The N373 solenoid valve then regulates how much of that hydraulic pressure reaches the multi-plate clutch pack. Higher pressure equals more clamping force, which equals more torque transferred rearward. The software map governs the entire pressure ramp: how fast it rises, how high it goes, and when it backs off.
Gen-4 versus Gen-5: the hardware difference that matters
Gen-4 uses an electric pump paired with a hydraulic accumulator. The accumulator stores pressure, so the system can deliver near-instant clutch engagement the moment the controller commands it. Gen-5 removes the accumulator entirely and instead regulates clutch pressure by varying pump rotational speed. Response is still fast, but it is more dependent on the software map telling the pump exactly what to do and when.
| Feature | Gen-4 Haldex | Gen-5 Haldex |
|---|---|---|
| Pressure source | Electric pump + accumulator | Variable-speed electric pump only |
| Response method | Stored pressure released on demand | Pump speed ramped in real time |
| Software dependency | Moderate | High |
| Factory torque split (hard acceleration) | Front-biased (~70:30) | Front-biased (~70:30) |
| Tuning potential | Good | Greater (more software-governed) |
| Platform examples | Golf Mk6 R, Audi TT Mk2 | Golf Mk7/8 R, Audi S3, Leon Cupra |
The practical implication of Gen-5’s software dependency: because Gen-5 hardware is highly standardised across MQB platforms, two cars with identical mechanical Haldex units can behave very differently at launch purely because of their software maps. A Golf R and a Leon Cupra share the same hardware architecture; the difference you feel is almost entirely in the controller strategy.
Factory maps on both generations prioritise stability and driveline longevity. The 70:30 front-rear split under acceleration is not the system’s physical limit. It is a deliberate software choice. The clutch is capable of transferring up to 50% of torque rearward, but that condition is only invoked under specific circumstances, such as detected wheelspin or certain drive modes.
Why does front-wheel slip still happen with launch control active?
Brief front-wheel slip during a launch is normal Haldex behaviour. Sustained or inconsistent spin is not. The distinction matters because misreading the former as a fault leads owners to replace parts that are working exactly as designed.
Mechanical and software causes of wheelspin at launch:
- Torque ramp rate: The ECM releases engine torque faster than the Haldex clutch can build full clamping pressure, especially on cold systems where oil viscosity is higher.
- Pump warm-up: A cold Haldex pump takes slightly longer to reach operating pressure. Early launches on a cold car will always show more front slip than a warmed-up system.
- Conservative factory maps: The J492 controller deliberately delays full rear engagement to protect the driveline. This is a factory-controlled slip strategy, not a failure.
- Tyre grip: Cold or worn tyres break traction before the clutch can compensate, regardless of how fast the system responds.
- Brake technique: Holding too little brake pressure during a launch control hold allows the car to creep, which disrupts the ECM’s torque demand signal to the J492.
The timing gap between throttle demand and full clutch pressure is typically a fraction of a second, but at high torque outputs that is enough for the front tyres to spin. On a stock car with stock power, this is barely noticeable. On a car with an engine tune that has increased front-axle load, the same gap becomes a real traction problem because the Haldex map was never updated to match the new power level.
| Observed behaviour | Most likely cause | Action |
|---|---|---|
| Brief, consistent front slip at launch | Normal factory strategy, cold pump | No action needed; warm up the system |
| Sustained front spin throughout launch | Engine tune without Haldex remap, worn clutch plates | Haldex software update or service |
| Inconsistent launches, sometimes good, sometimes poor | Degraded fluid, failing pump motor, worn filter | Service kit, pump duty check via VCDS |
| No rear engagement at all | N373 valve fault, pump failure, major fluid loss | Workshop diagnostic, fault code read |
| Engagement only after significant wheelspin | Reactive (not predictive) response, possible controller fault | Check J492 coding, compare measured values |
Engine modifications are where this gets genuinely problematic. A Stage 2 engine tune on a Golf R or S3 can push front-axle torque well beyond what the stock Haldex map was calibrated for. The result is front-axle overload during launches, with the rear not receiving enough torque to help. The fix is not a hardware swap. It is a matched Haldex software update.
How do you diagnose a Haldex fault versus normal behaviour?
Work through this in order. Skipping to fault codes before checking the basics wastes time and can send you down the wrong path.
- Safety first. Carry out any raised-wheel or hoist tests with the car properly supported. Never run a Haldex engagement test with a wheel in the air and someone underneath the vehicle.
- Check fluid level and condition. Remove the Haldex unit filler plug and confirm the oil is at the correct level. Dark, burnt-smelling fluid means an overdue service. Fresh fluid is amber and clear.
- Inspect the filter. A blocked Haldex oil filter starves the pump of clean fluid and is a common cause of sluggish engagement. Replace it as part of any diagnostic service.
- Check fuses and wiring. A blown fuse to the pump motor or J492 controller produces symptoms identical to a mechanical fault. Confirm supply voltage to the pump before condemning hardware.
- Connect VCDS or equivalent and read Address 22. Log the following measured values: pump motor duty cycle (%), N373 valve position, measured clutch pressure (bar), and any stored or intermittent fault codes.
- Perform a hoist test. With the car raised and in gear at low speed, command engagement via Address 22 output tests and watch whether clutch pressure builds to the expected value. Pump duty and N373 valve position are the most reliable indicators of system health at this stage.
- Road test with live data. Log pump duty and clutch pressure during a hard pull from low speed. Compare measured torque split against expected factory values.
What fault codes and measured values tell you:
- High pump duty with low clutch pressure: hydraulic restriction (blocked filter, worn pump internals, stuck N373 valve) or worn friction plates that cannot hold pressure.
- N373 valve codes (open circuit, short to ground): the valve is not receiving or responding to commands. Check wiring before replacing the valve.
- Pump motor codes: confirm supply voltage first. A pump drawing excessive current but producing low pressure suggests internal wear.
- Intermittent engagement with no stored codes: often fluid-related. Service the unit and retest before replacing any components.
What to tell your mechanic: record the exact conditions when symptoms appear (cold or warm, first launch or repeated launches, specific drive mode), the measured values from Address 22, and any fault codes with their freeze-frame data. Ask specifically for a pump duty log under load, not just a static fault code read.
Pro Tip: The single most useful non-obvious test is to watch pump motor current draw while commanding clutch engagement on a hoist. A pump that draws high current but produces low measured pressure almost always indicates a worn or sticking relief valve, not a failed pump motor. Replacing the motor without addressing the valve wastes money and leaves the root cause in place.
What tuning and hardware changes actually improve launch performance?
Software is where the biggest gains come from, and it is also where the biggest mistakes happen. Getting this right means understanding what each type of modification actually changes.
Software-only upgrades (Stage 1 Haldex flash)
A software-only Haldex flash rewrites the J492 controller’s maps: pump duty curves, pressure ramp rates, pre-charge timing, and the torque split bias across throttle and speed inputs. The factory 70:30 front-rear split under acceleration can be shifted toward a near 50:50 split, which means more torque reaches the rear wheels earlier in the launch. Clutch response time improves because the pre-charge command is more aggressive.
Real-world drag strip data from tuner testing shows 60-foot launch time improvements of around 0.08–0.10 seconds after a software upgrade, with better consistency across repeated runs. That figure is not enormous in isolation, but combined with an engine tune it compounds into a meaningfully faster car off the line.
Software plus hardware (Stage 2)
Adding an uprated relief valve spring or a full valve assembly upgrade alongside the software allows the controller to safely command higher clutch pressures than the stock relief valve would permit. The software tells the pump to push harder; the hardware lets it do so without the relief valve bleeding off pressure prematurely. APR’s Stage 2 approach, for example, pairs software with hardware to achieve larger, safe pressure increases than software alone can deliver.
Hardware-only changes, such as fitting a stiffer relief valve spring without a matched software update, do increase clamping pressure at high pump duty cycles, but the controller still follows its stock logic for when and how hard to engage. The safest performance gains come from matched software and hardware, where the controller’s commands and the hardware’s pressure limits are calibrated together.
On the question of tuning and UK insurance: any modification that alters the AWD system’s behaviour is a material change to the vehicle. Declare it to your insurer. Failure to do so can void a claim, regardless of whether the modification caused the incident. This applies equally to software-only flashes and hardware changes.
Risk and benefit summary:
- Drivetrain stress: higher clutch pressures increase wear on friction plates if the system is not serviced regularly. Service before tuning, not after.
- Cooling: a tuned Haldex system working harder during repeated launches generates more heat. Thermal derating after consecutive launches is a real risk; allow cool-down between runs.
- Warranty: any software modification to the J492 controller will void the Haldex unit’s manufacturer warranty. On older cars this is rarely a concern; on newer vehicles it is worth weighing up.
- Sequencing: always service the unit first (fresh oil, new filter, pump health check), then apply software. Tuning a unit with degraded fluid accelerates wear.
For a deeper look at how controller changes interact with component durability, the Haldex controller tuning guide on the Haldexparts blog covers safe operating parameters in detail.
How do you set up and drive for consistent launches?
Getting repeatable launches from a Haldex car is as much about preparation and technique as it is about the hardware.
Before you launch
Tyre pressure matters more than most owners realise. Run the manufacturer’s recommended pressure or slightly lower for track use; over-inflated tyres reduce the contact patch and make the front axle more likely to spin before the Haldex clutch can compensate. Tyre temperature matters too. Cold rubber on a cold morning will break traction at torque levels that warm tyres handle without drama.
Do two or three firm acceleration runs before attempting a timed launch. This warms the Haldex fluid, brings the pump to operating temperature, and lets the clutch plates reach a consistent thermal state. A cold Haldex system on the first launch of the day will almost always show more slip than the same system after a warm-up.
Brake technique during launch control hold is often wrong. Hold the brake firmly enough to keep the car stationary against the engine’s torque demand. A weak brake hold allows the car to creep, which disrupts the ECM’s torque demand signal and can cause the Haldex controller to under-pre-charge the clutch. On most VAG MQB cars, the brake pedal is the correct hold method; a handbrake launch is not recommended and can cause uneven clutch loading.
Select the appropriate drive mode. On cars with a Race or Performance mode, this typically sharpens the ECM’s torque delivery and, on tuned cars, activates a more aggressive Haldex map. Check your specific vehicle’s drive mode documentation, as Haldex engagement parameters vary by mode on the same platform.
Managing heat across multiple launches
Repeated launches without cool-down will thermally derate the Haldex system. When the pump and fluid overheat, the controller reduces clutch pressure to protect the unit, and your launches become progressively worse. At a track day, allow at least five minutes between launch attempts. If your launches are noticeably less consistent on the third or fourth run than the first, heat is almost certainly the cause.
If your car has a switchable FWD mode (available on some tuned Gen-5 cars via software), you can use it to perform a short burnout to heat the rear tyres before a drag run. On UK public roads, this is illegal and carries real consequences. Keep it to a private track or drag strip.
Safety note: repeated launch control use on public roads in the UK risks prosecution under the Road Traffic Act 1988 for dangerous or careless driving, regardless of whether an accident occurs. Track days and private test facilities are the appropriate venue.
Key takeaways
Haldex’s factory software is the primary reason for front-wheel slip at launch, not hardware failure, and a matched service plus software update is the most effective fix for owners who want consistent, faster starts.
| Point | Details |
|---|---|
| Brief front slip is normal | Factory 70:30 torque split causes expected front-wheel slip during launches; this is software strategy, not a fault. |
| High pump duty, low pressure is the key red flag | If VCDS shows high pump duty but low measured clutch pressure, suspect a blocked filter, worn relief valve, or degraded fluid. |
| Service before tuning | Fresh oil, a new filter, and a pump health check must come before any software or hardware modification. |
| Matched software and hardware wins | Combined software and hardware upgrades deliver safer, more consistent gains than either alone, with 60-ft improvements of 0.08–0.10 seconds reported. |
| Haldexparts for OEM-grade service parts | Haldexparts supplies service kits, pumps, oils, and filters for VAG, Ford, and Land Rover Haldex systems, with free UK delivery on orders over £150. |
The part most people get wrong
The most common misdiagnosis in any Haldex launch complaint is treating a software decision as a hardware failure. Owners feel front-wheel spin, assume the rear axle is not engaging, and book the car in for a pump replacement. The pump is often fine. What is actually happening is the factory controller doing exactly what it was programmed to do: protecting the driveline by delaying full rear engagement.
What frustrates me about this pattern is how easily it is avoided. A ten-minute VCDS session with live data logging during a hard pull will tell you whether the pump is building pressure and whether the clutch is receiving it. If both are happening and you still have front slip, the map is the problem. If pump duty is high and pressure is low, then you have a hydraulic issue worth investigating. Those are two completely different repair paths, and conflating them costs money.
The DIY tuning pitfall worth flagging is the relief valve spring upgrade done in isolation. It does increase clamping pressure at high pump duty, but without a matched software update the controller still applies its conservative stock logic for when to engage. You end up with a system that can clamp harder but still waits too long to do it. The spring is not useless, but it is a partial solution at best, and it is not a substitute for a properly calibrated software map.
For anyone running an engine tune above stock power levels, the Haldex remap is not optional. It is the part of the package that makes the rest of it work properly.
OEM Haldex service parts, delivered across the UK
If your diagnostic session has confirmed a service is overdue, or you are preparing the system before a software upgrade, starting with a complete Haldex service kit is the right move. A kit covers the oil, filter, and seals in one order, which means no waiting on separate deliveries before you can start.
Haldexparts stocks OEM-grade service kits, pump motors, and Haldex oils for VAG MQB platforms (Audi, VW, SEAT, Škoda), Ford, Land Rover, and Volvo applications. Parts are priced to be competitive with dealer supply without the dealer lead times, and orders over £150 qualify for free UK delivery. Whether you are a DIY owner working through the diagnostic checklist above or a workshop sourcing parts for a customer’s car, the product pages include fitment data by model and generation so you can confirm compatibility before you order. Browse the full range at haldexparts.co.uk and get the right parts on the way today.
Useful sources and further reading
The sources below are worth bookmarking whether you are a technician working through a diagnostic or an enthusiast planning a tune.
For technicians and diagnostics:
- VAG SSP 994609AG — Audi/VW factory service paper covering J492 controller logic, signal flow, and measured value interpretation. The primary technical reference for Gen-4 and Gen-5 diagnostics.
- VW Haldex 4Motion Generation IV technical note — Covers the accumulator-based Gen-4 architecture and hoist test procedures in detail.
- How Haldex diagnoses faults: a technician’s guide — Haldexparts stepwise diagnostic workflow with Address 22 measured value lists.
- Haldex pressure sensor function: technician’s guide — Technical detail on pressure sensor readings and what deviations indicate.
For enthusiasts and tuners:
- Road Rage Performance Gen-5 Haldex upgrade — UK-based tuner overview of software strategy changes and real-world launch data.
- APR AWD software product overview — Covers Stage 1 and Stage 2 approaches, pressure changes, and matched hardware options.
- APR technical blog on Haldex upgrades — Explains why matched software and hardware outperforms hardware-only changes.
- Haldex controller tuning guide — Haldexparts guide on safe operating parameters and controller upgrade sequencing.
- Why Haldex limits power delivery — Background on conservative factory maps and the engineering reasons behind front-biased behaviour.
- AWD system service best practices — Maintenance intervals, fluid specifications, and pump health guidance for long-term reliability.



